Frequently Asked Questions
Listed below are some commonly asked questions and links to where you can find answers in our Interactive User's Guide.
TIP: When you click on a topic, the content slides down. You can click on the topic again to slide it up (hide it). Pretty clever, isn't it?
Classroom Management:
 How do I print abecelee login cards for my students?
Print Login Cards
*It is necessary to be logged
into the Report and Management Web site to complete this
process.
-
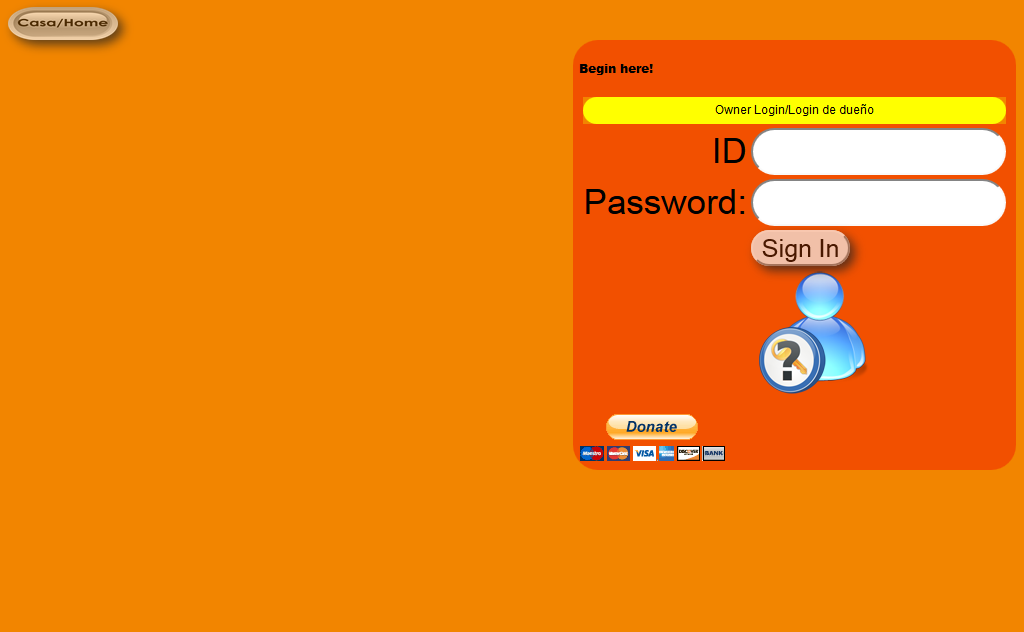
Type your ID and password in the boxes provided at the right of the page. The screen will open to your classroom.
-
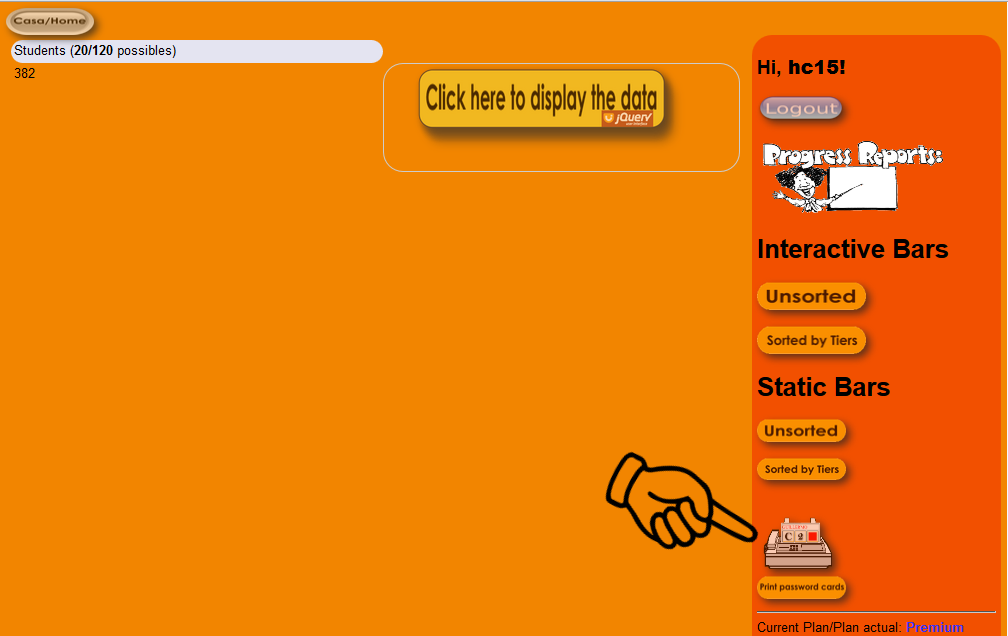
In the right menu, select Print Students Password Cards.
-
Login
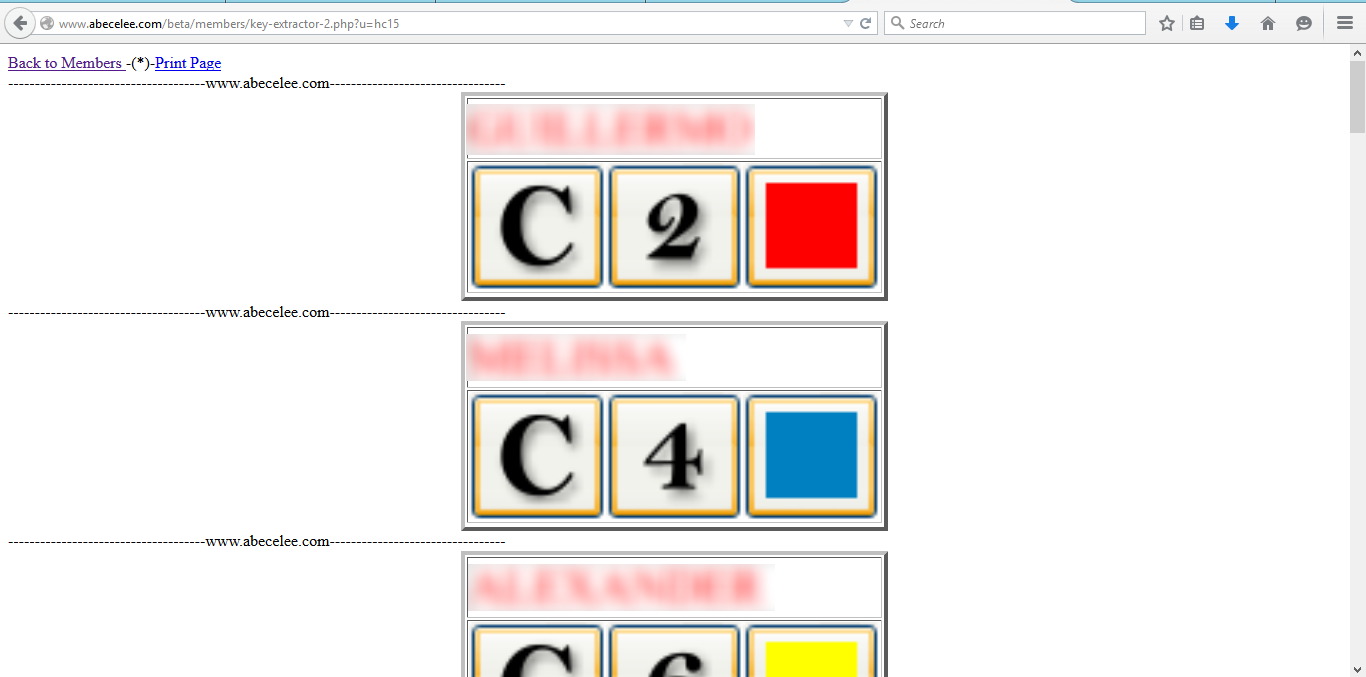
cards contain the student's user name, and password, composed by a letter, a number and a color.
TIP: Login cards show all students' user names in capital
letters; and yet, there is no need for keyboard, because students' usernames show up in a box on the login
screen and they just need to recognize them and click on them. Passwords do not need to be entered as they appear, the order does not matter. In the center of the
card is the student's user name written in all capital letters and password
below it.
-
When printing, select Print
Page to ensure correct formatting.
-
Follow
any additional steps required by the printer itself in the print window
that appears.
Suggested Uses for Cards:
-
These cards can be printed, laminated,
and stored on a ring for easy organization. Then they can be used
by the students every time they get on the computer.
-
These cards are ideal for younger students
or students with vision impairments.
-
Other Uses of
Login Cards
-
Make a second print. This print is useful to keep in a substitute
folder so that substitute teachers can easily find student account
information. It can be used in the same manner for the classroom teacher
and the computer lab instructor.
-
Older students tend to not need individual
login cards, so teachers can initially give the login information
to the students and then use the list as a reference if anyone has
difficulty remembering their information. This practice for older
students reduces the use of paper and provides for simpler information
storage.
 How do I manually add students to a class?
Add/Remove Students – Manually
Add Students
It is
recommended that student data be added by a teacher.
All
student data is associated with the student's user name and the password. This allows teachers to search and review the data for multiple purposes, for students to easily transfer between campuses, or for students
to be removed without any data being lost.
It is necessary
to be logged
into the Report and Management Web site to
complete this process.
-
Type your ID and password in the boxes provided at the right of the page. The screen will open to your classroom.

-
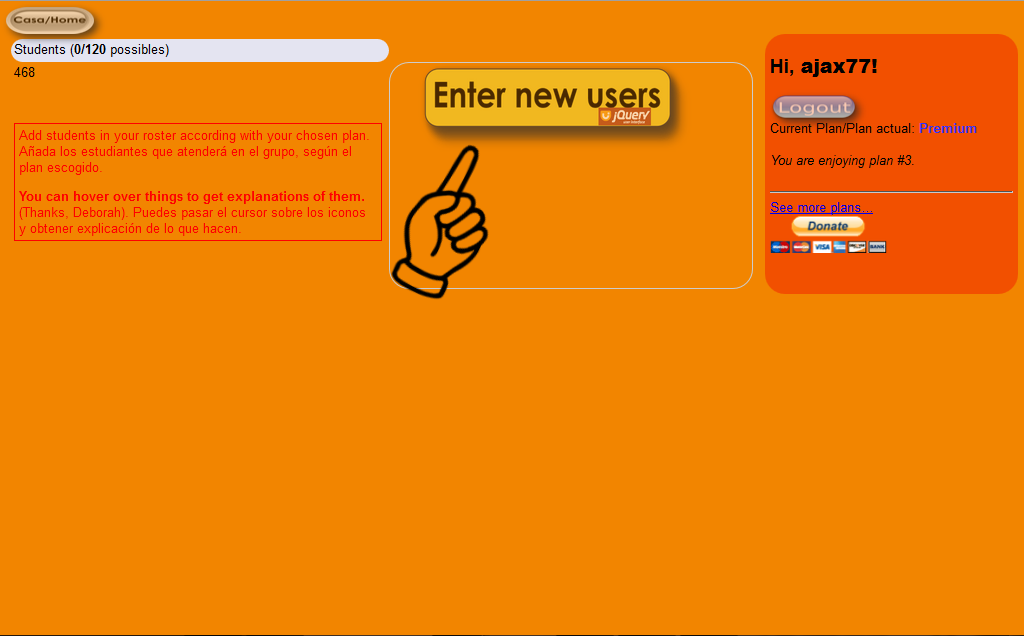
Once in the Manage page, click on the yellow big button. Note: this button will say "Enter new users" if you do not have users yet.
-
The data table is displayed. (1) click on the button "New user" to show the submition tool. (2) type your new username. (3) click on "Submit". The code converts any typing to uppercase. Also, if a typing is composed by two words (first and last names) it is converted to a single word in uppercases, like: "John Doe" is converted to "JOHND", like in the example (4).
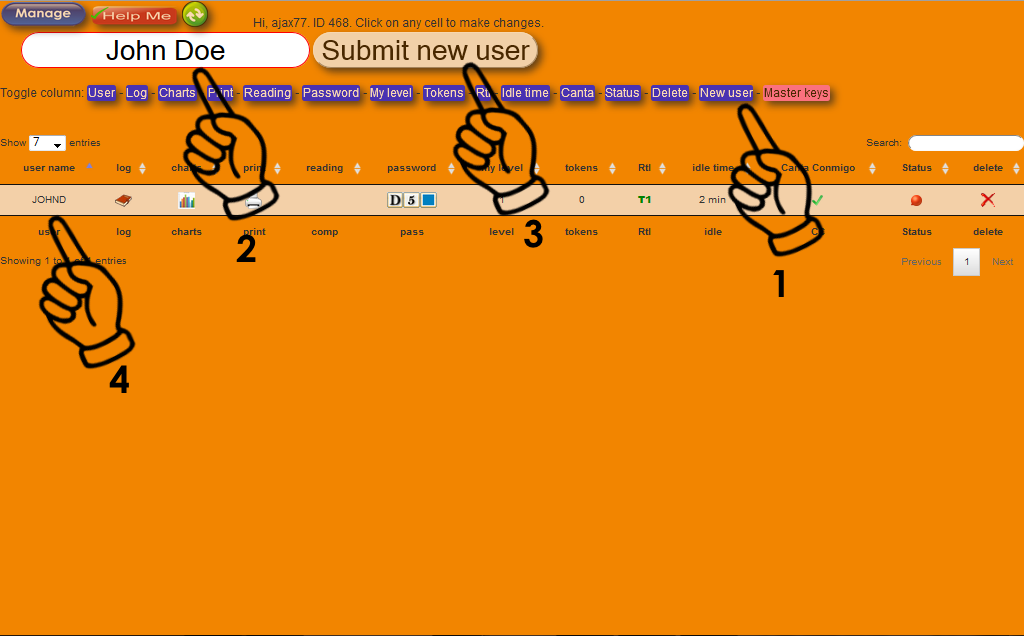
-
Every user is asigned at first to level 1, with a private password, 0 tokens, 2 minutes idle time, Tier 1, access to Canta Conmigo and Offline status. To modify this data, click on any icon. The data opens to changes.
-
To add an additional student, click Type new student here and repeat steps 2 and 3.
Common Issues
in Adding Students
- It is not permitted to enter two users with same username. If the student ID is already in use by another student enrolled...
SOLUTION: Create another user name. The code provides with suggestions.
Remove Students
To
help preserve historical data about classrooms and schools, student accounts
should NOT be removed at the end of the school year.
All student data
is associated with the student's ID number, the password and the associated teacher. This allows students to be
removed and re-added without any data being lost.
Students who are
added to another school in the district will automatically be removed
from the original school.
-
Click on the red cross by the user name.
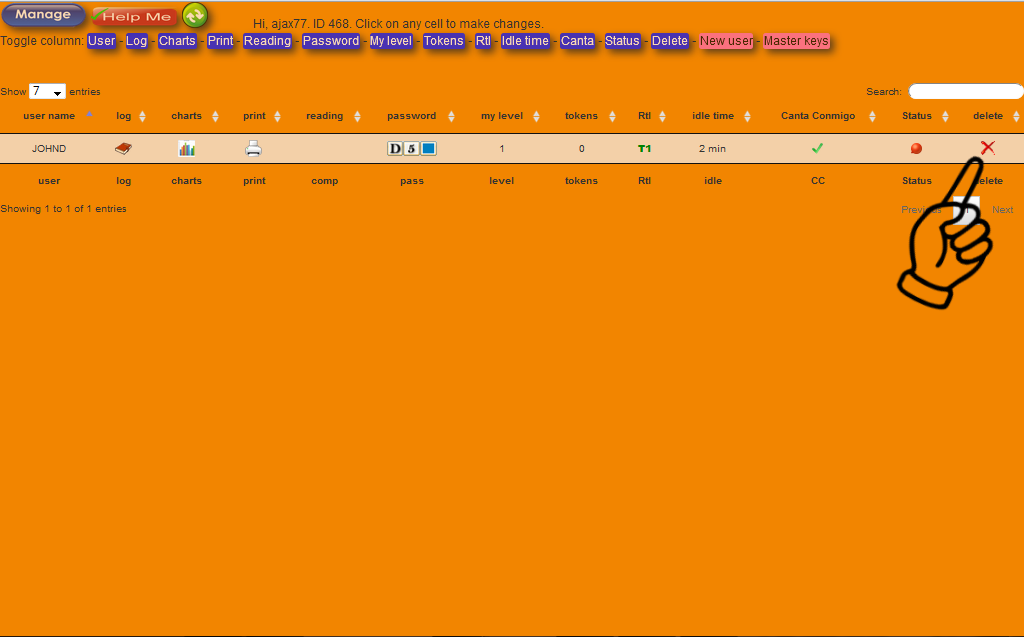
- That user name is removed permanently.
 How do I manually remove students from a class?
 What is Response to Intervention (RtI) and how do I use it?
How to use Response to Intervention (RtI)
Response to Intervention (RtI) is available for all students. Once assigned, the assessment will
begin during the student's next session.
TIPS:
-
For students struggling in one level, it is recommended to assign Tier 3 (RED) RtI. The system is moving up to YELLOW and then to GREEN when the student completes one cycle of three (3) points, without changing up to the next level.
-
For Advanced students, it is recommended to leave RtI unchecked (GREEN).
It is necessary
to be logged
into the Report and Management Web site to
complete this process.
-
After
logging in, select the student, and then click on the Modify button
at the middle of the page. The screen will slide down to the most recent data for that student.
-
Choose from the three (3) options included the RtI variable.
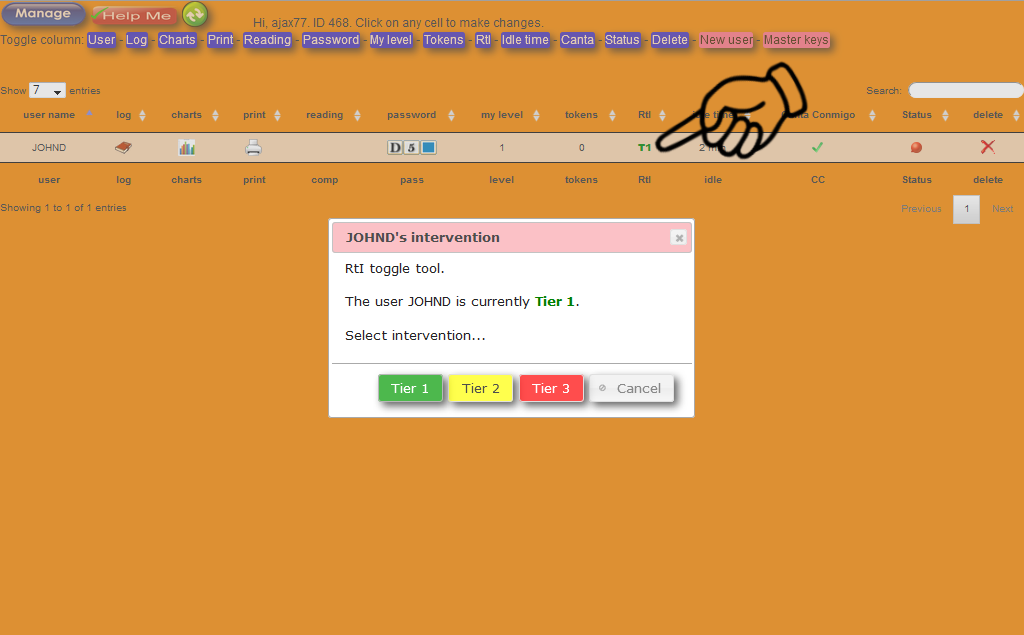
Suggested Uses for Instructional Purposes:
-
Struggling students benefit from this differentiation. Teachers can choose whether continue this accommodation from level to level, until the students reach level 7, point in which this feature does not work any more.
-
Specific intervention needs can be
determined by reviewing the student's responses on the tests.
-
The following levels: #1, #2, #3, #5 and #6 are impacted with this intervention tool.
-
Tier 1 (Green) does not modify the process; Tiers 2 and 3 give more help, visual clues, phonemic and phonological support, so the students succeed.
-
this feature no longer works after level #6.
-
It is up to the instructor to make the students return to the prior level without intervention to reteach and double check for understanding.
-
When you declare a student under RtI, ABECELEE is going to automatically scaffold and shuffle the resources for every level, starting with less difficult queries, repeating more often the queries. After an analysis of results, the teacher can either release that student from the differentiation and allow him/her to continue normally, or to assign that student to a lower level, with No RtI, in order to check for understanding.
 How do I change student's settings?
How to change settings
Teachers can change settings for all students. Once changed, the new settings will begin during the student's next session. It is a good practice to teach the students browsing skills
TIP: Teach the students browsing skills, like refreshing the browser at request. That speeds up the time when new settings begin to work. Refreshing the browser can be done by hitting F5, by clicking on the little round arrow by the URL box, or by clicking on the green button with rounded arrows provided on the site.
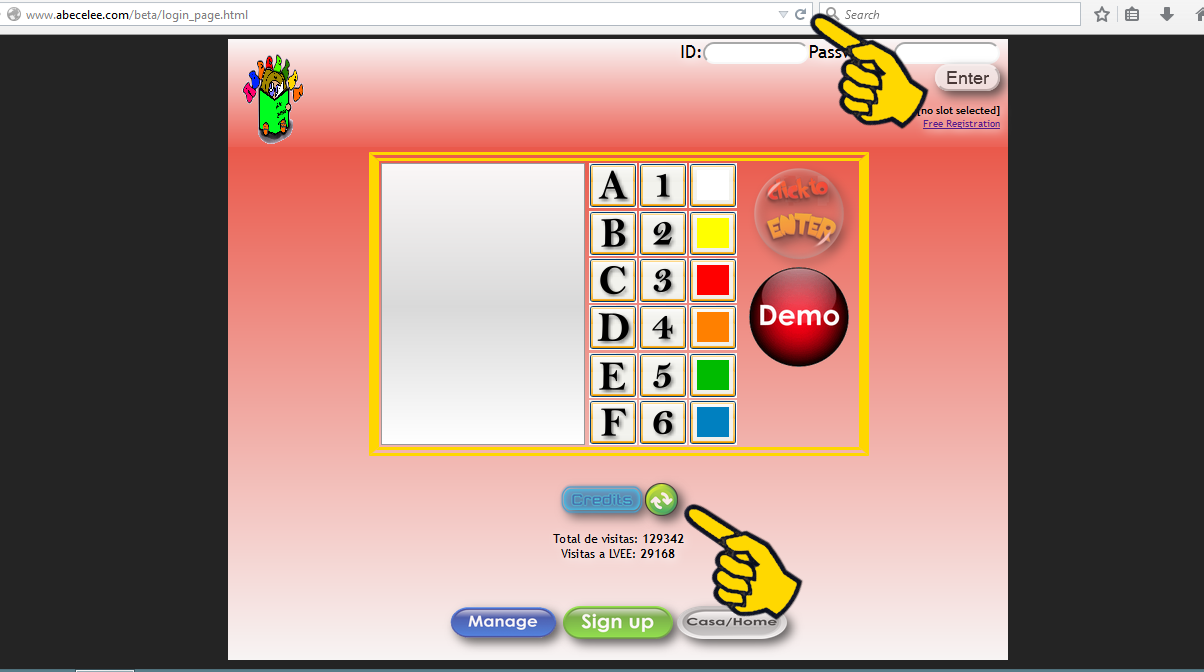
It is necessary
to be logged
into the Report and Management Web site to
complete this process.
-
After
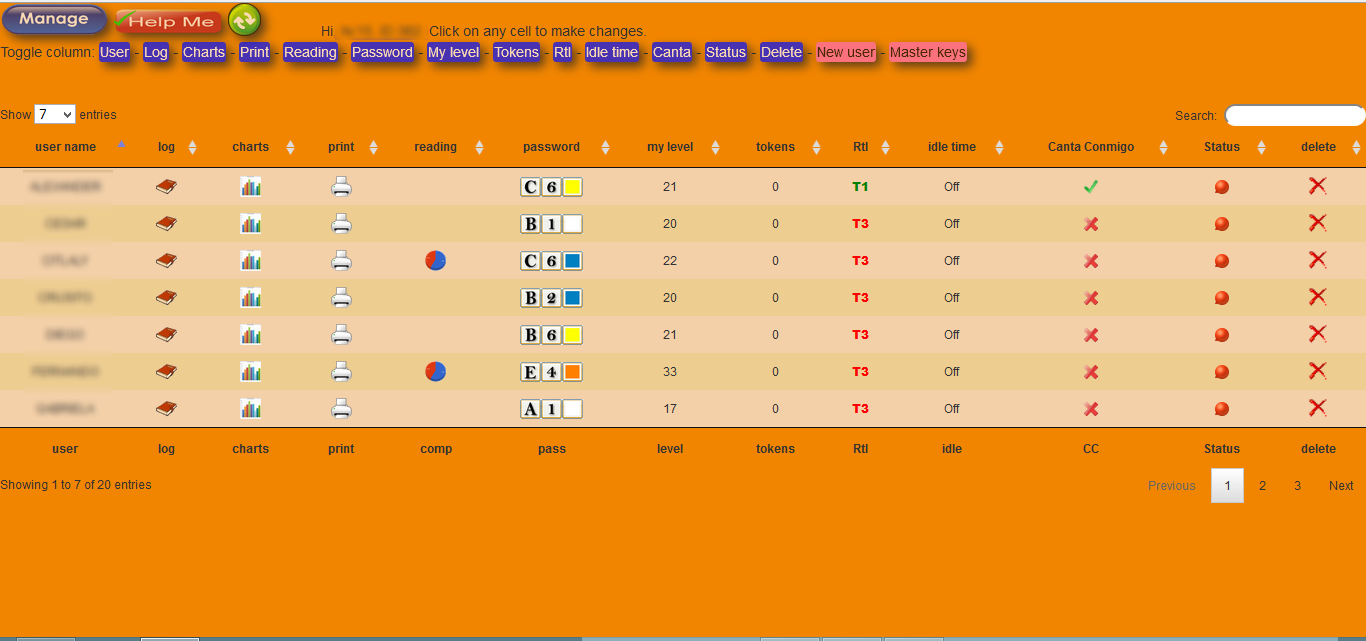
logging in, click on the button "Click here to display the data" at the middle of the page. The screen will open to the data table with the most recent data for all your students.
-
Choose from the several settings variables included.
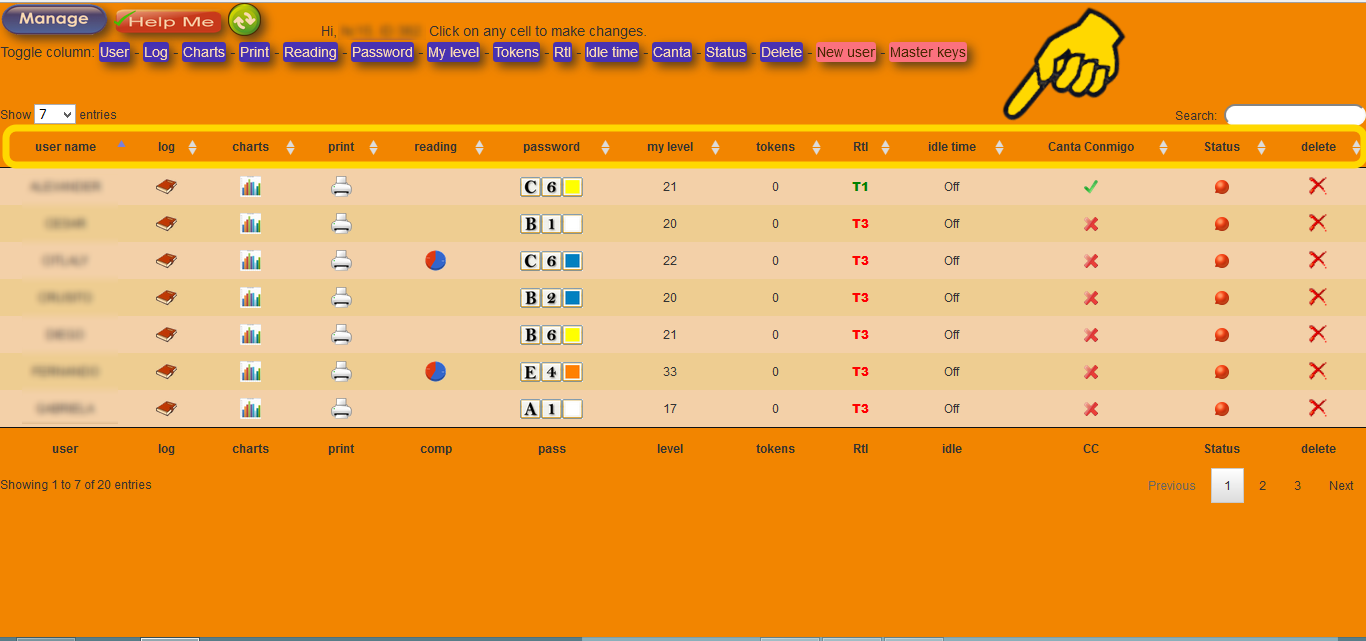
Quick explanation of settings:
-
User name: The students' user name. Be careful, students get used to their user name, changing it can create confusion.
-
Log: The student's chronological list of interactions with the site: please see "How do I get individual reports" to learn more about this feature.
-
Charts: The student's list of interactions with the site plotted as bar graphs: please see "How do I get individual reports" to learn more about this feature.
-
print: The student's chronological list of interactions with the site converted in a text document: please see "How do I get individual reports" to learn more about this feature.
-
reading: The student's performance from level 22 and up, when working with reading comprehension activities: please see "How do I get individual reports" to learn more about this feature.
-
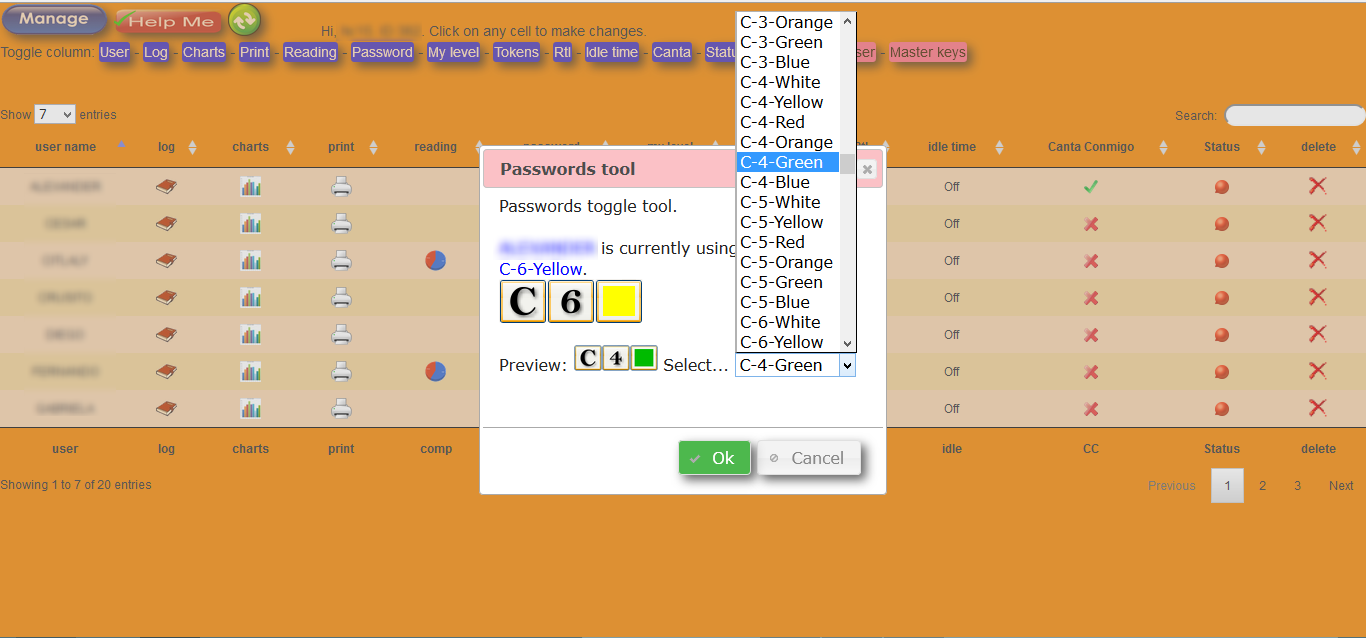
password: The student's individual password to enter the activities. The teacher may change this password. Since the system generates the first password, sometimes it is convenient to change it for something easier to memorize; also, if a home account is created, it is recommended to maintain same password both for school and at home. This change is accomplished by assigning a combination of three elements: a letter from A to F, a number from 1 to 6 and the colors of spectrum.
-
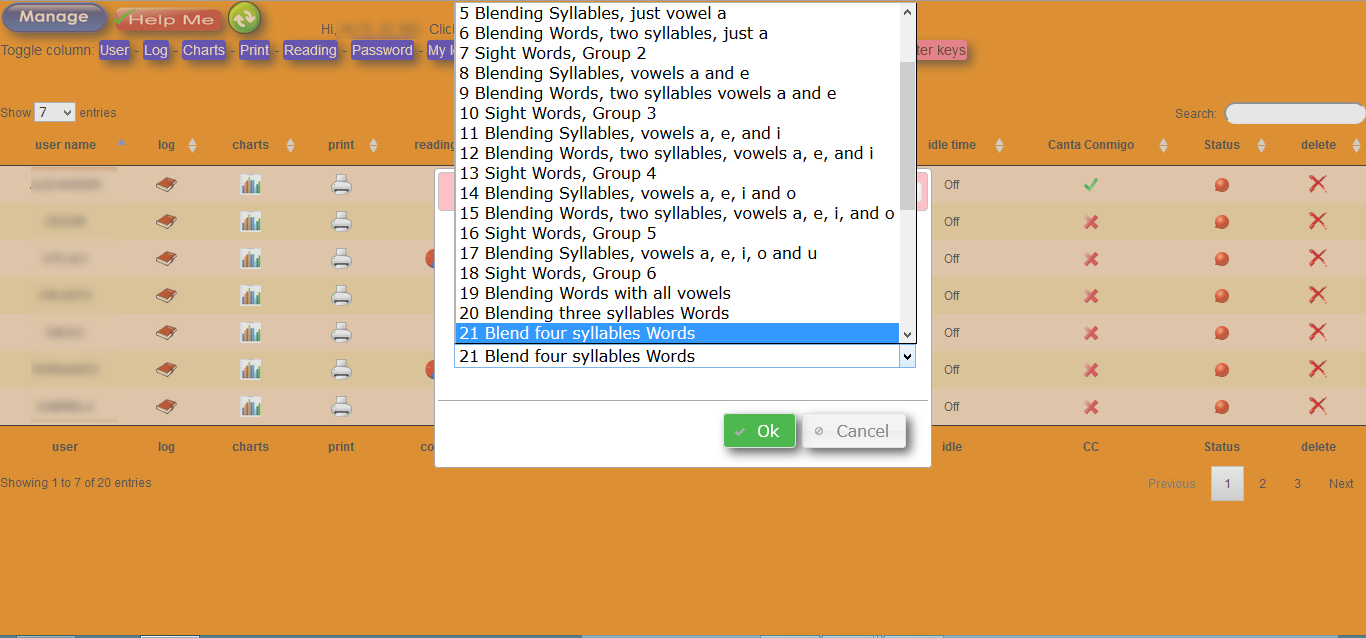
my level: The starting level where the student begins instruction. This variable can be changed after teacher's decision. By default begins on level 1 and increments value after the student's completion.
-
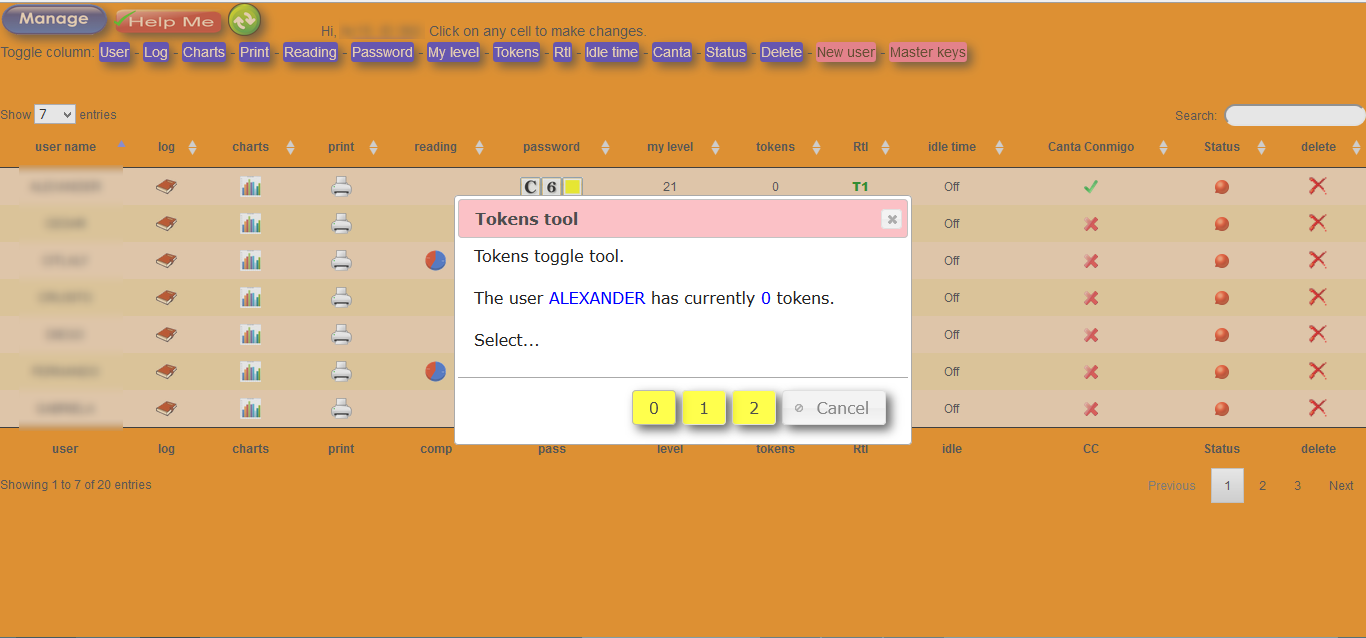
tokens: Points accrued by the student in the current level of instruction. It can be changed by the teacher. It is seasonal (every season in the year has its own icon: snowman, heart, butterfly, sun, fall leaves) for the purpose of introducing the concept of seasons.
-
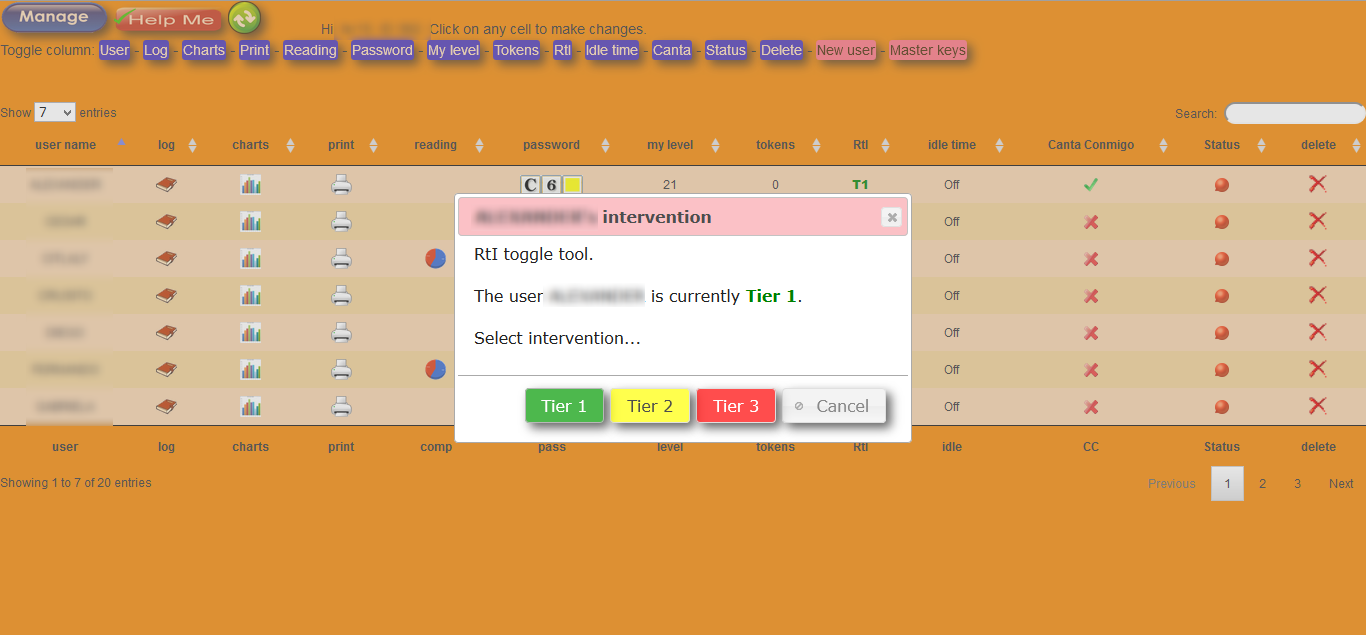
RtI: Response to Intervention. Please refer to FAQ #4 for details.
-
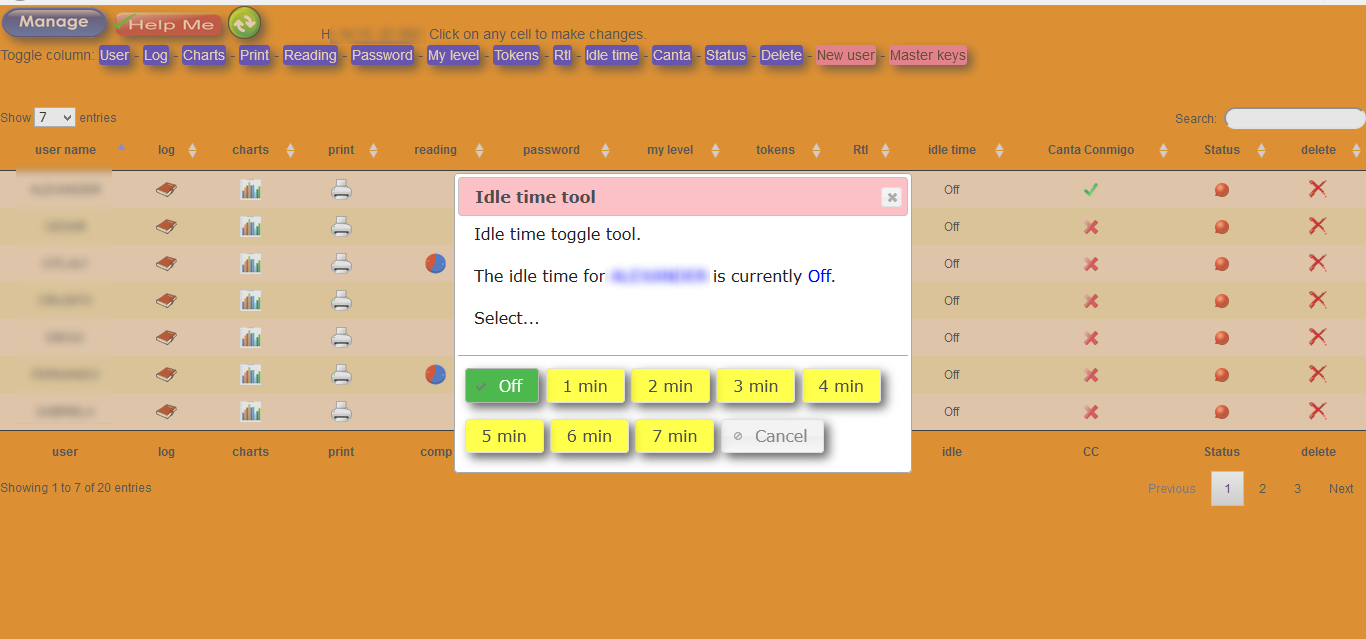
idle time: Needed if we want to monitor when the students are not interacting with the site. It is set to 2 minutes at first, and it can be modified from 1 to 7 minutes, or off.
-
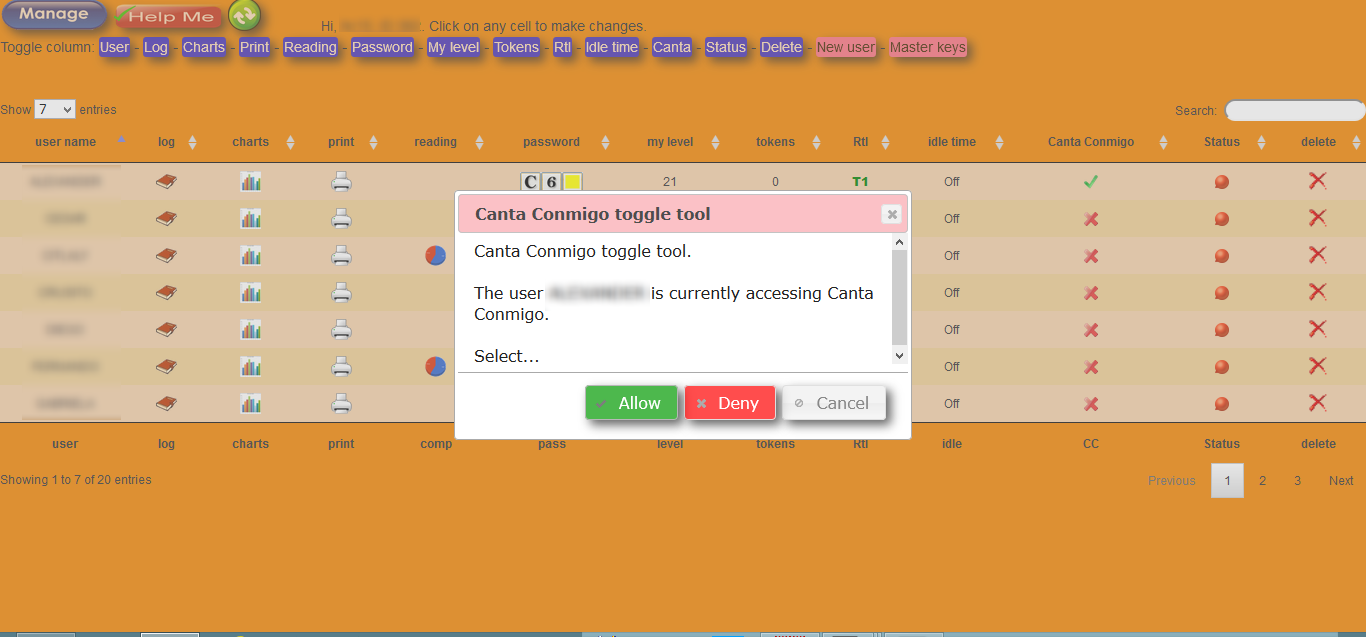
Canta Conmigo: In this section the students learn through songs, rhymes and readings. The teacher may block the access to this section to focus on the completions of a certain level. When you declare "No", the icon disappears from the student's work area.
-
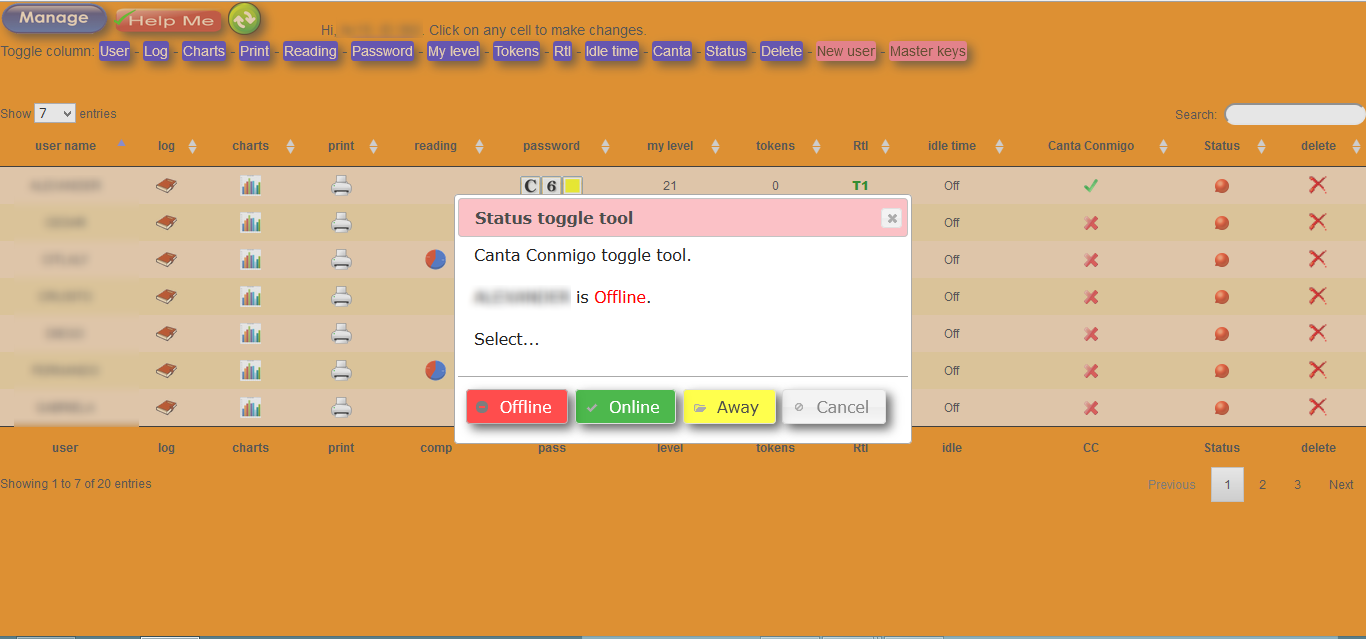
status: reflects real time the status of the student, it can be offline, online or away, which usually is when visiting Canta Conmigo.
-
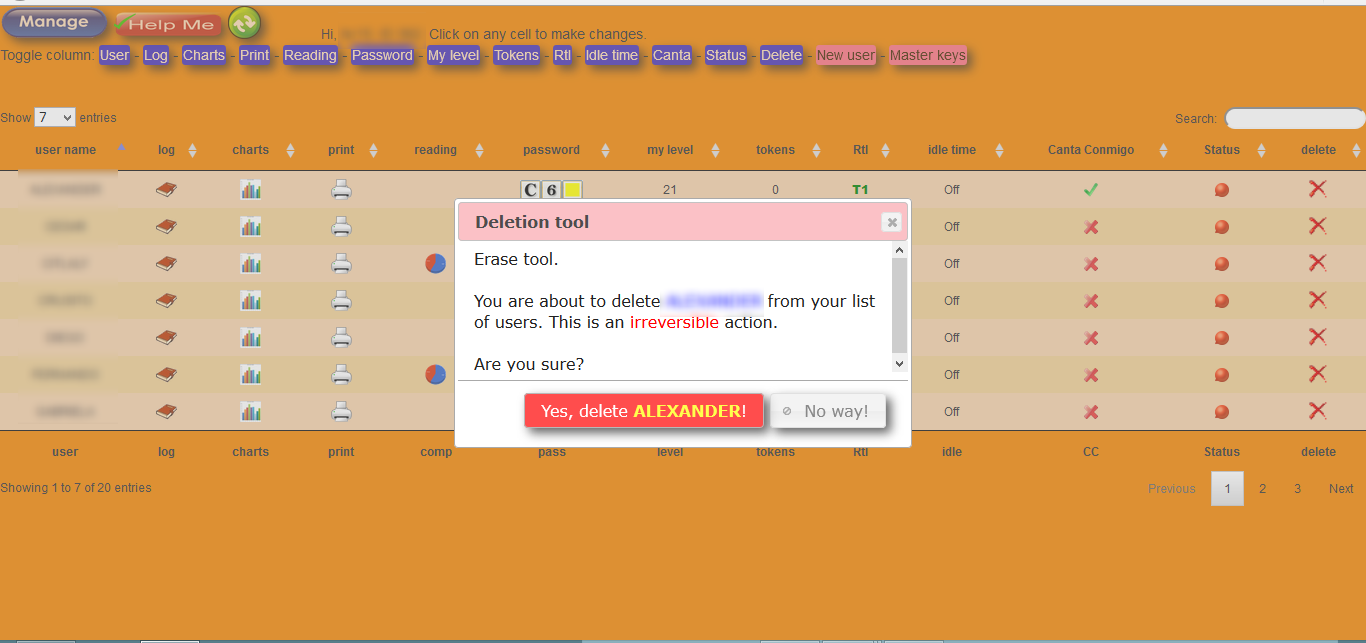
delete: action of erasing permanently the student from the database.
-
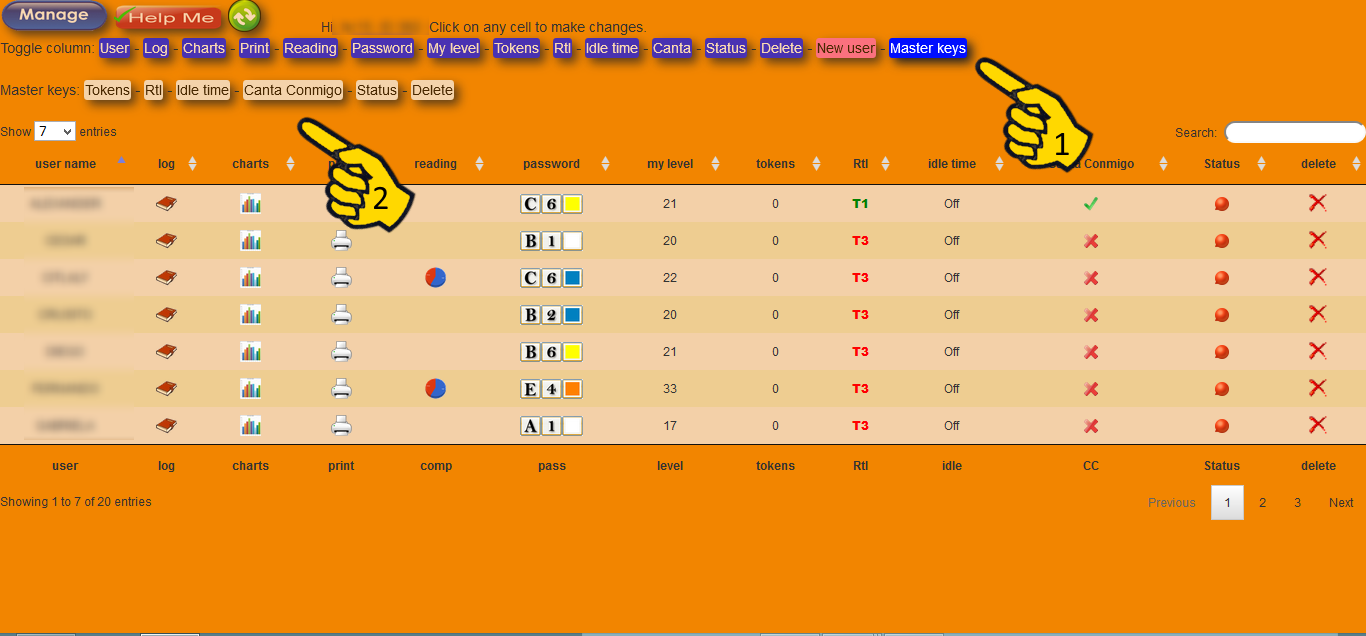
Master keys: these keys deliver the same action in whole class scale.
-
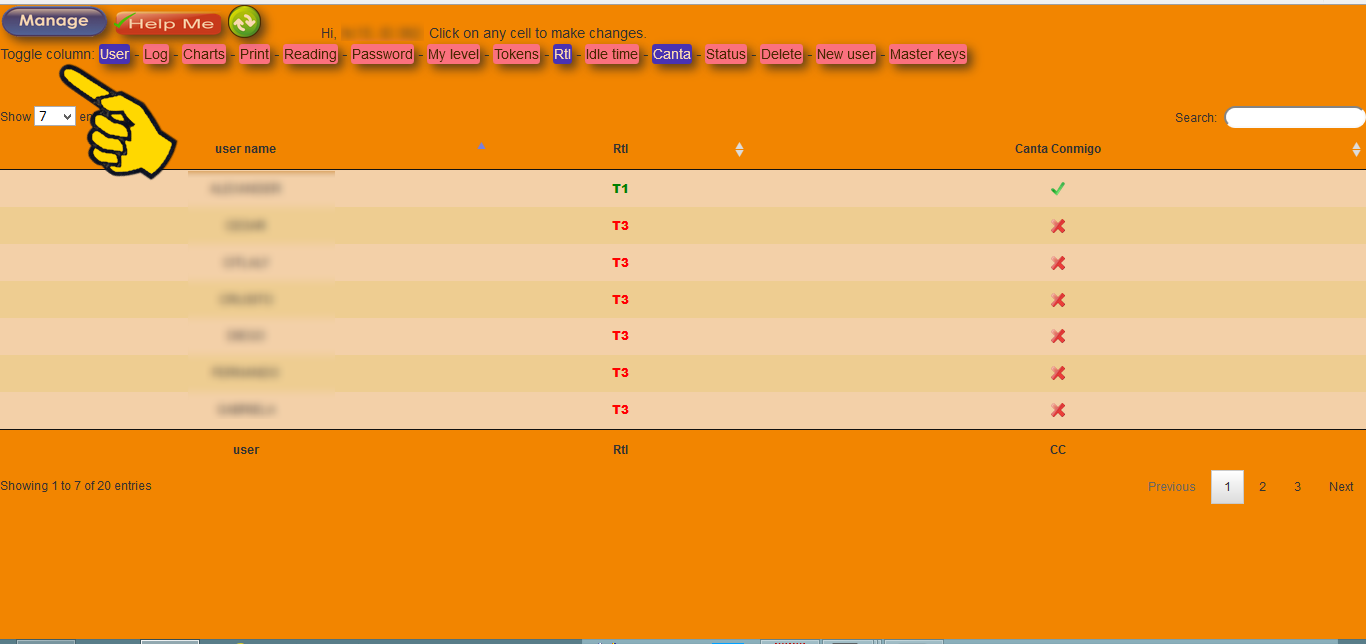
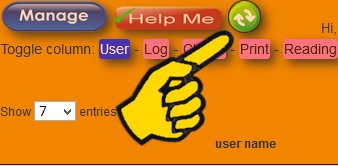
Toggle column keys: columns can be shown or hidden at will.
-
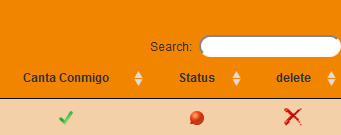
You can also
refine your search...
-
...and
refresh the page, reloading the most current data.
Logging On, Using Student Program, and Report & Management Web site:
 How does a student log onto ABECELEE?
ABECELEE Application Navigation
By logging into ABECELEE, students are able to take a grade appropriate assessment and work in the interactive instruction. Because of ABECELEE's technology design, students may at any time use any computer at the school.
Initial levels are determined by the system (level #1), and yet the teacher may reassign to a different level. The pace and passing to upper levels are determined by individual student performance. While in the interactive instruction, students are not able to change the activity presented to the student, however teachers can do that by using the tool RtI.
Logging In:
Students will need their account information (login cards) to access the application. Although there is no need to install any program on the computer, it is a good practice to declare a desktop icon of the main page. Please refer to your technology expert if you do not know how to do that. Every browser has its own way of creating desktop shortcuts, here is how Firefox and Chrome do that.
1. Double click on the ABECELEE Application desktop icon.

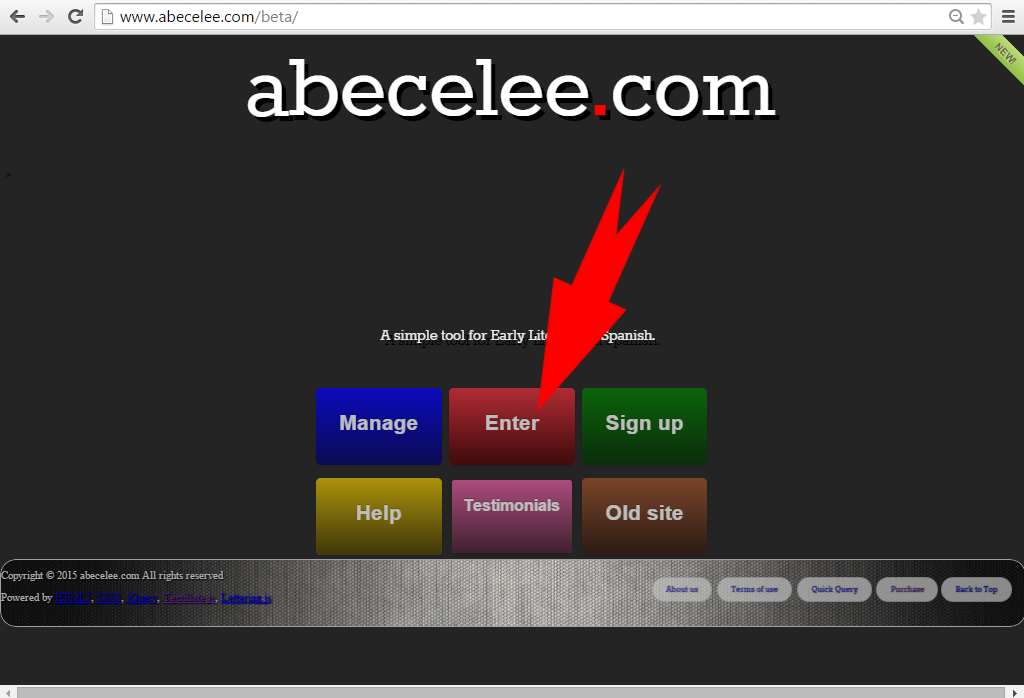
2. This action takes to the application's main page. Students should click on the red button "Enter".
3. This action takes to the application's student's login page. This page has to be already signed in by the teacher. It is done by typing the teacher's ID and password in the boxes provided top right of the page.
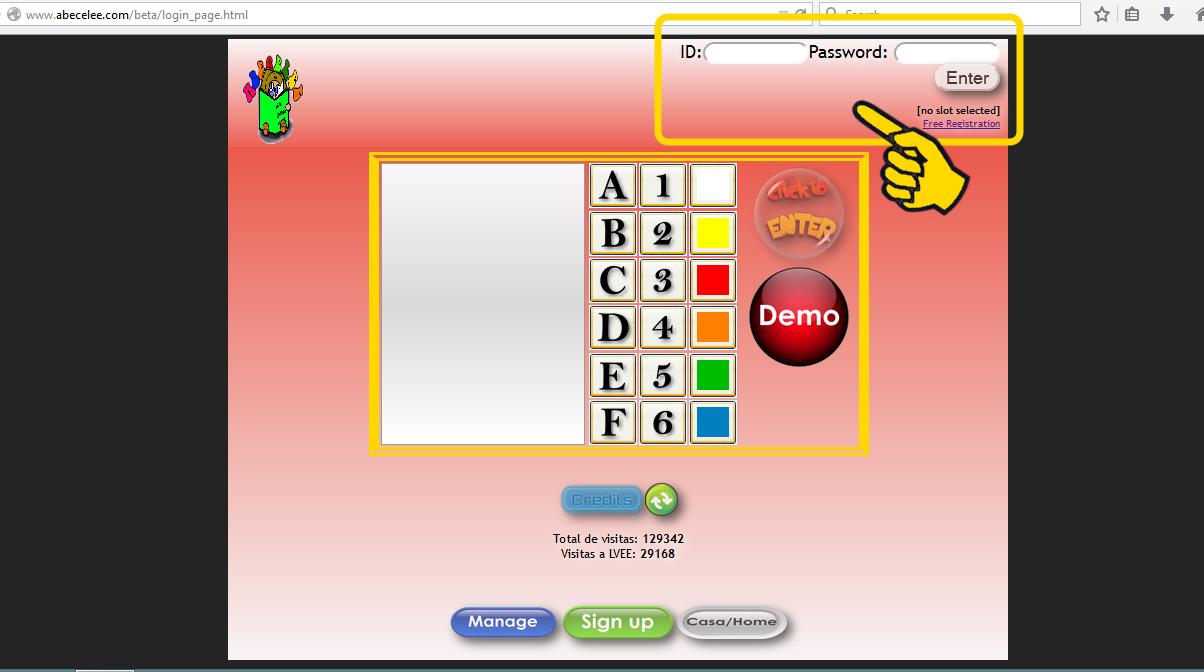
4. This action populates the students dialog box
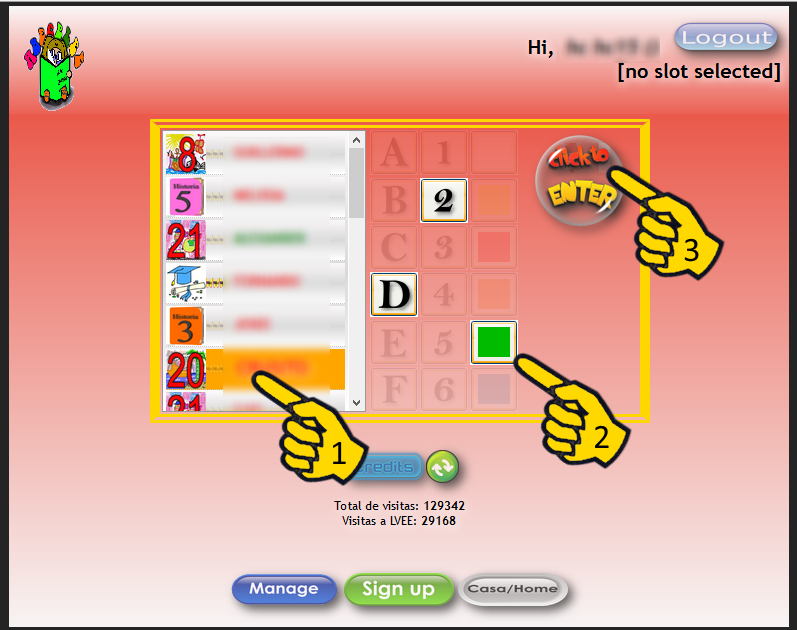
5. Students will scroll to find and click on their user names and passwords on the login screen. Login cards show all students user names in capital letters. Passwords do not need to be entered in the order as they appear.
6. Students should click on Enter. They will be taken to the appropriate activity. Students will be able to see any interactive instruction (levels) to which they have access. They can start working on the appropiate level of instruction, or they can visit the page "Canta Conmigo" (Sing Along)
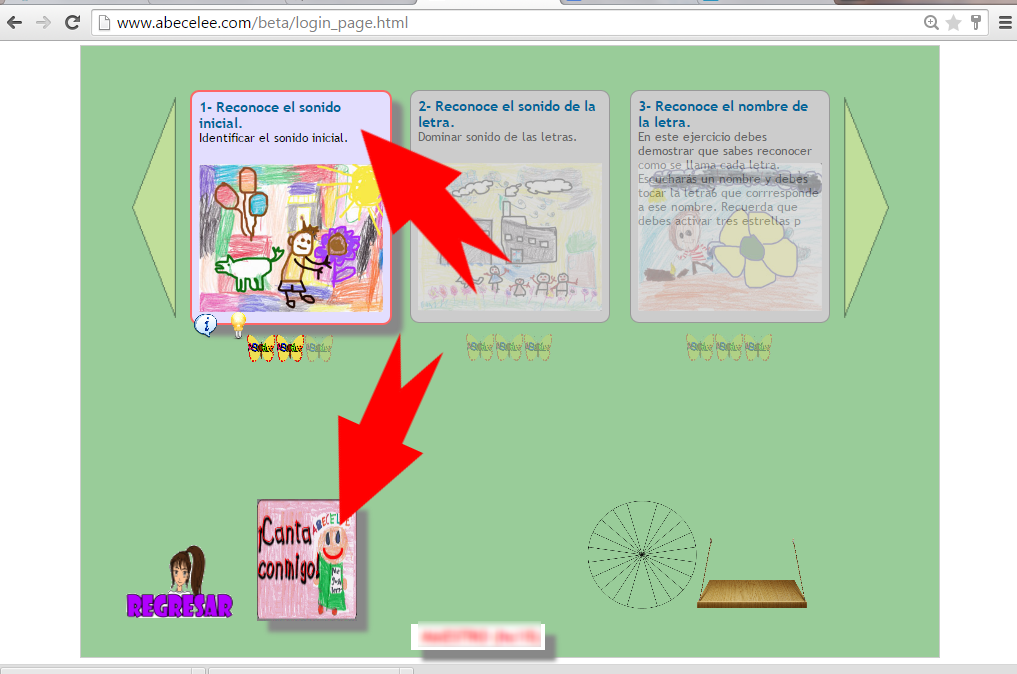
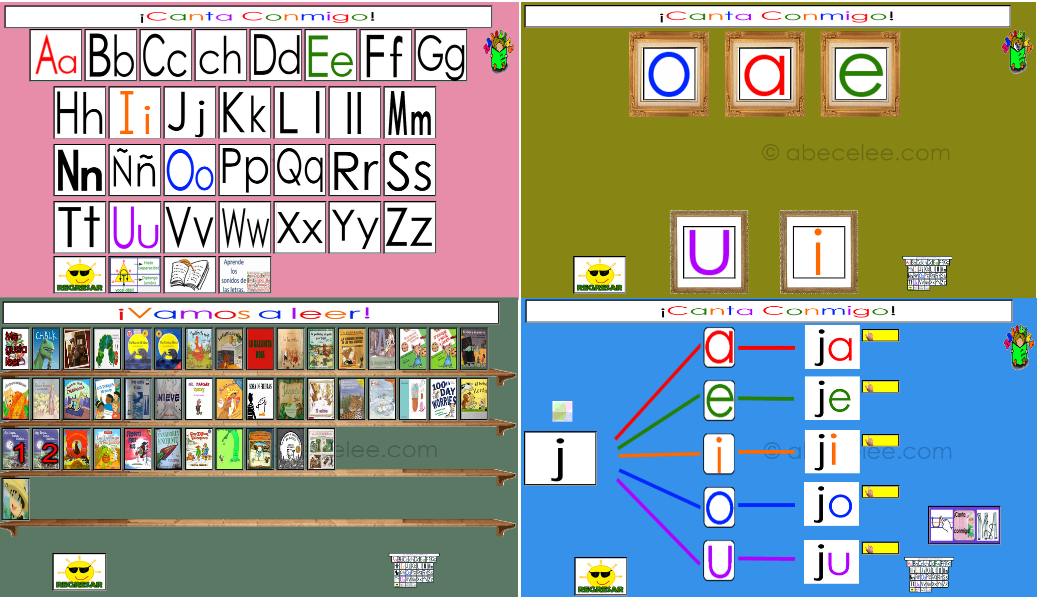
7. Canta Conmigo (Sing Along) is an instructional page where students can navigate to, with opportunities to learn while singing along, rhyming, reading and listening to read books, and blending sounds of the alphabet. Below there is a collage of some of the activities included:
TIPS: It is a good practice for the teachers to include themselves in the list to model for the students and to use the activities in whole class minilessons and sessions, or to view the interactive instruction. To do so, they must use their own account information. This will prevent any additional data from being created.
 How does an educator log onto the ABECELEE website?
Logging into the Report and Management Web Site
To review reports and manage classrooms, it is necessary to log into
ABECELEE’s Report and Management Web site. Each teacher or administrator
receives account information via e-mail from admin@abecelee.com to
log into the Web site.
-
Open a browser from those listed below and type www.abecelee.com into the address bar. Press the
Enter key.

-
Click the Manage blue button at the middle of the ABECELEE home page.
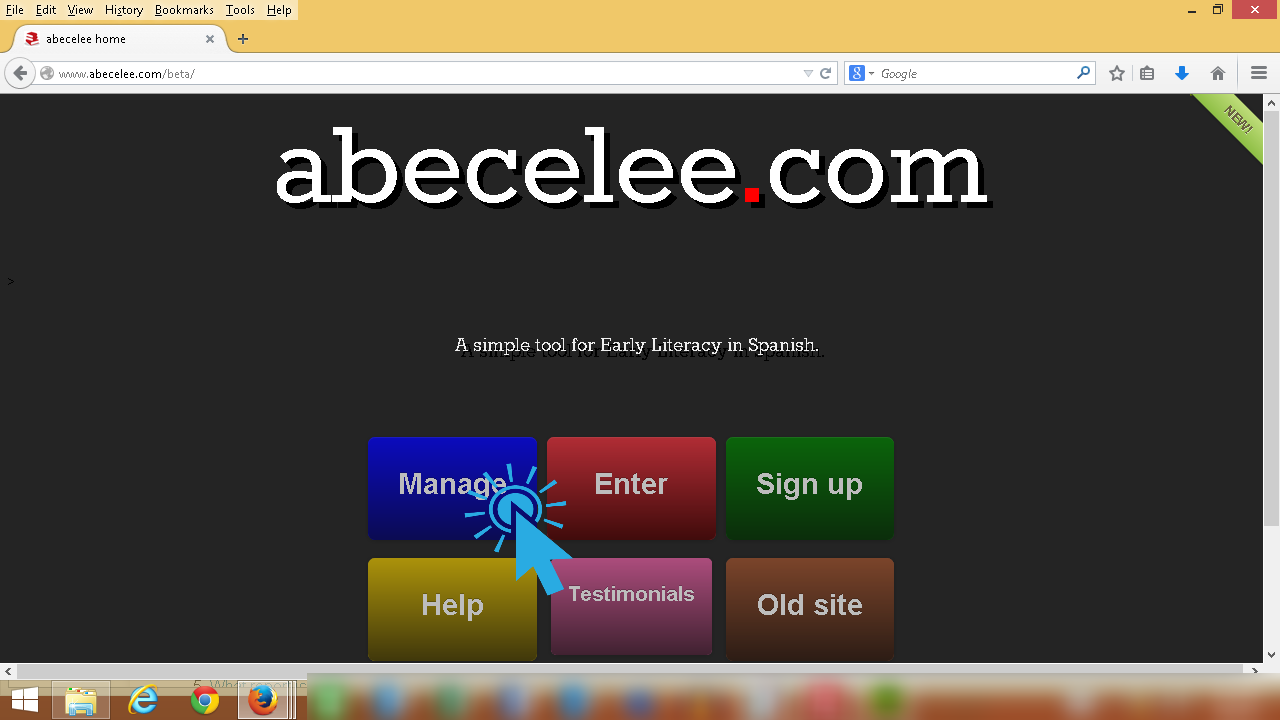
-
Enter user name and password on the login screen.

TIPS:
/Forgotten_Your_User_Name.jpg)
In the screen that appears, enter the user’s
e-mail address, and an e-mail will be sent to the user to allow the password
to be reset.
/Forgotten_User_Name_or_Password.jpg)
 How much time should a student use ABECELEE?
Toolbox - Usage Criteria
Usage Criteria
The number of minutes recommended for students on a weekly basis varies depending on teacher implementation. Common and daily assessments will shape the decision.
Usage Recommendations
Intervention Usage Criteria – Good Usage in the Intervention category:
-
Tier 3 students use the program for 120 minutes or more per week.
-
Tier 2 students use the program for 90 minutes per week.
-
Tier 1 students use the program for 45 minutes per week.
Supplemental Usage Criteria – Good Usage in the Supplemental category:
-
Tier 3 students use the program for 90 minutes or more per week.
-
Tier 2 students use the program for 60 minutes per week.
-
Tier 1 students use the program for 30 minutes per week.
-
We recommend the implementation of this rule RLA / students x stations: take the amount of minutes dedicated to language Arts, divide it by the total of students enrolled, then multiply by the number of stations (devices connected to th Web) available; as an example, having 120 minutes dedicated to Language Arts, and 20 students enrolled, and 4 stations, 120/20x4=21, every student has a total of 21 minutes to use ABECELEE daily.
Reports:
 How do I get ABECELEE reports?
Types of Reports
*It is necessary to be logged
into the Report and Management Web site to complete this
process.
-
Type your ID and password in the boxes provided at the right of the page. The screen will open to your classroom.

-
There are two sets of tools to generate reports: Whole class Reports...
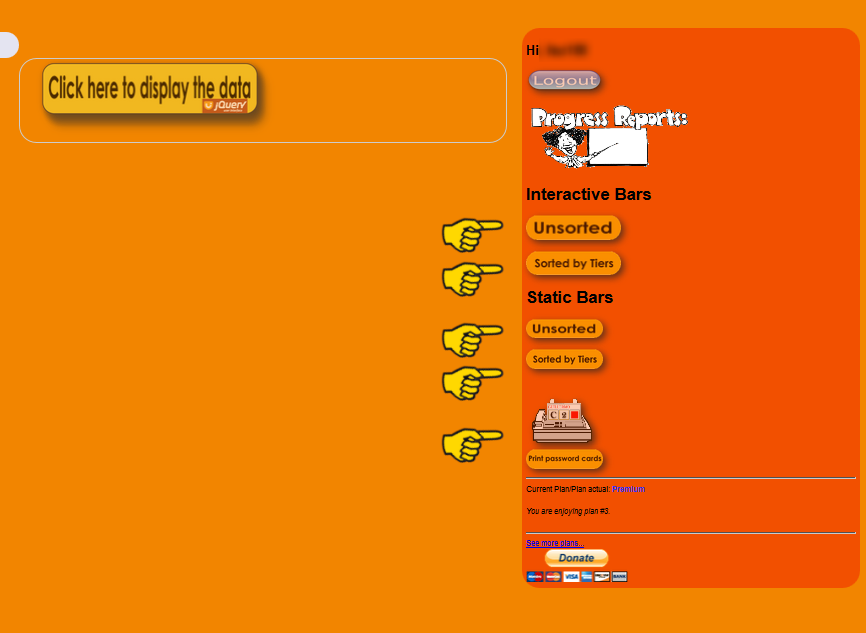
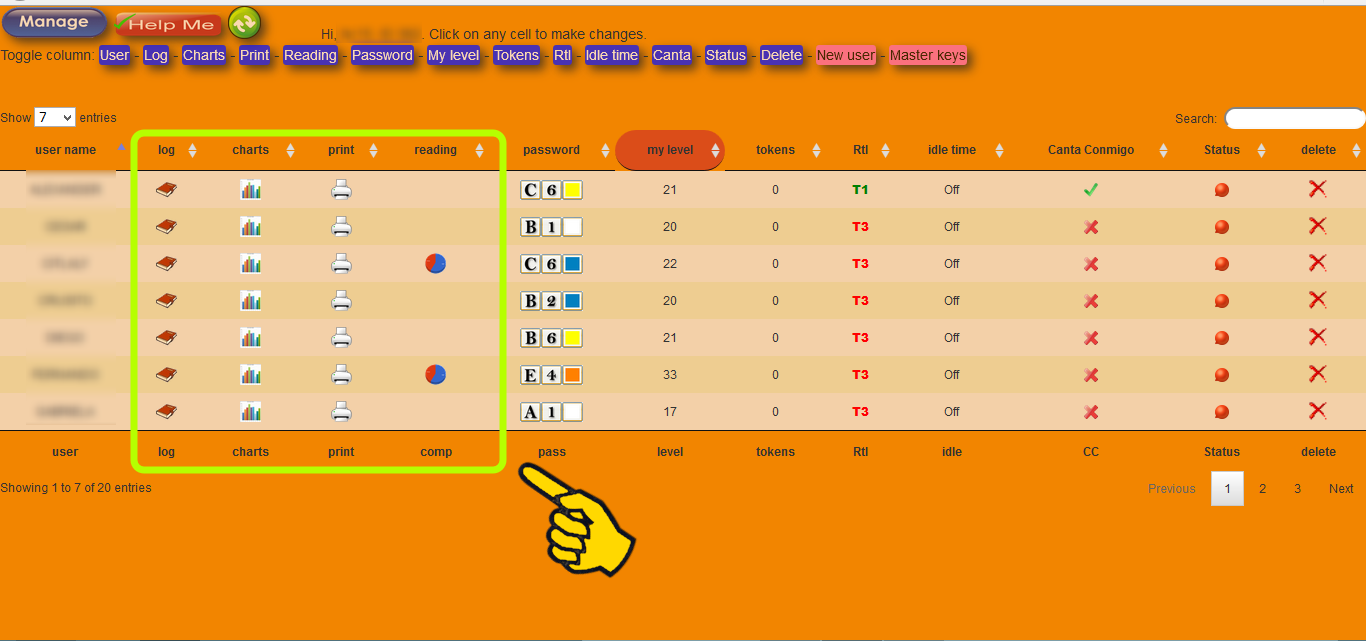
...and Individual Reports.
 How do I get Whole Class Progress Reports?
Whole Class Reports
*It is necessary to be logged
into the Report and Management Web site to complete this
process.
-
Type your ID and password in the boxes provided at the right of the page. The screen will open to your classroom.

-
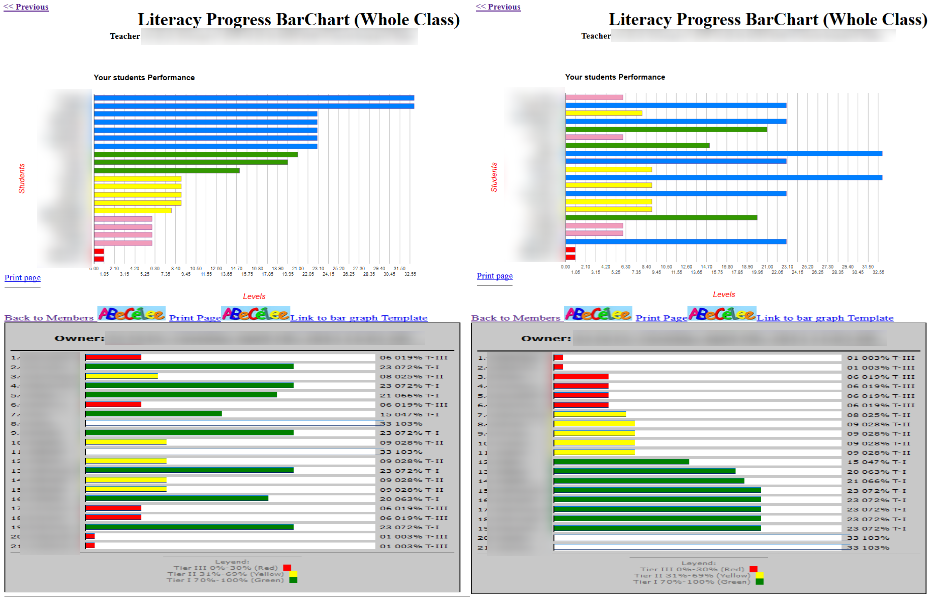
There are two sets of whole class tools to generate reports: by entry order and by tiers.

-
Below some examples of charts generated with this tool:
-
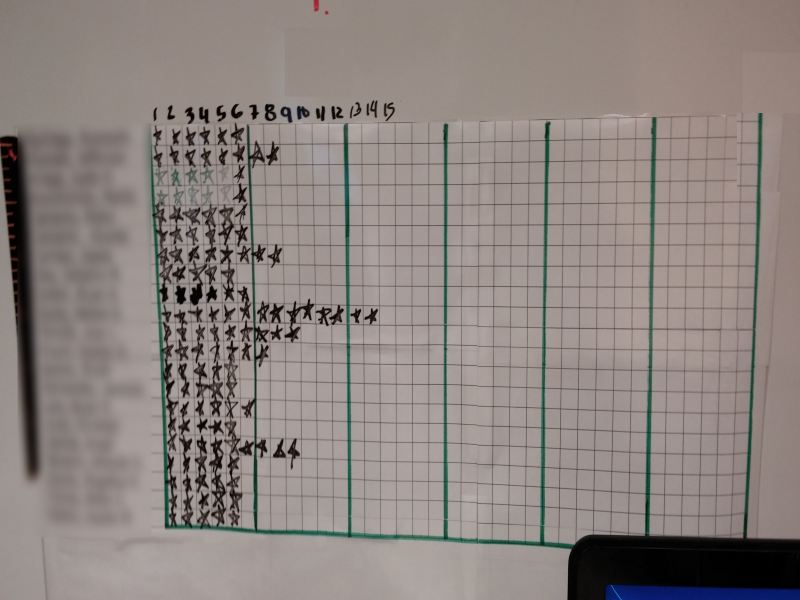
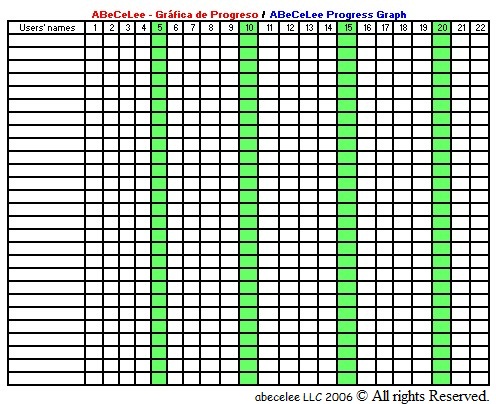
TIP: it is recommended to keep a classroom size chart updated by the students. They can use stickers of some sort. Every time they make to an upper level, they are allowed to update this chart. This is a good practice to increase stamina and stablish a healthy atmosphere of competition.
-
TIP: ABECELEE is offering its exclusive chart template. Teachers can downloaded it and print at their convenience.
 How do I get Individual Reports?
Individual Reports
Teachers can obtain individual reports from all students. Those reports can be used for reshaping instruction, reteaching, changing student's settings and printing to create students portfolios.
TIP: The Log is On Demand. Read below why.
It is necessary
to be logged
into the Report and Management Web site to
complete this process.
-
After
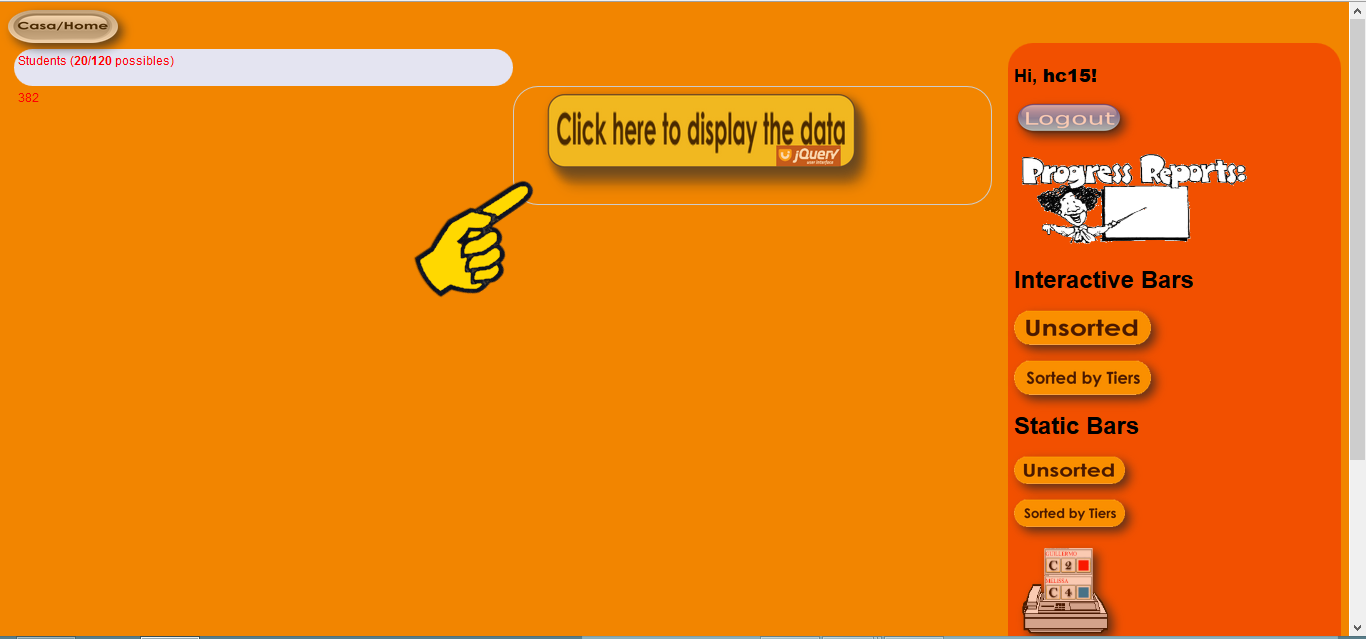
logging in, click on the button "Click here to diplay the data". The site will take you to the data table with the most recent data for that student.
-
Choose from the four tools included. If the student is not working on the instructional level #23 or higher, the tool "comprehension pie chart" is not visible.

Quick explanation of these tools:
-
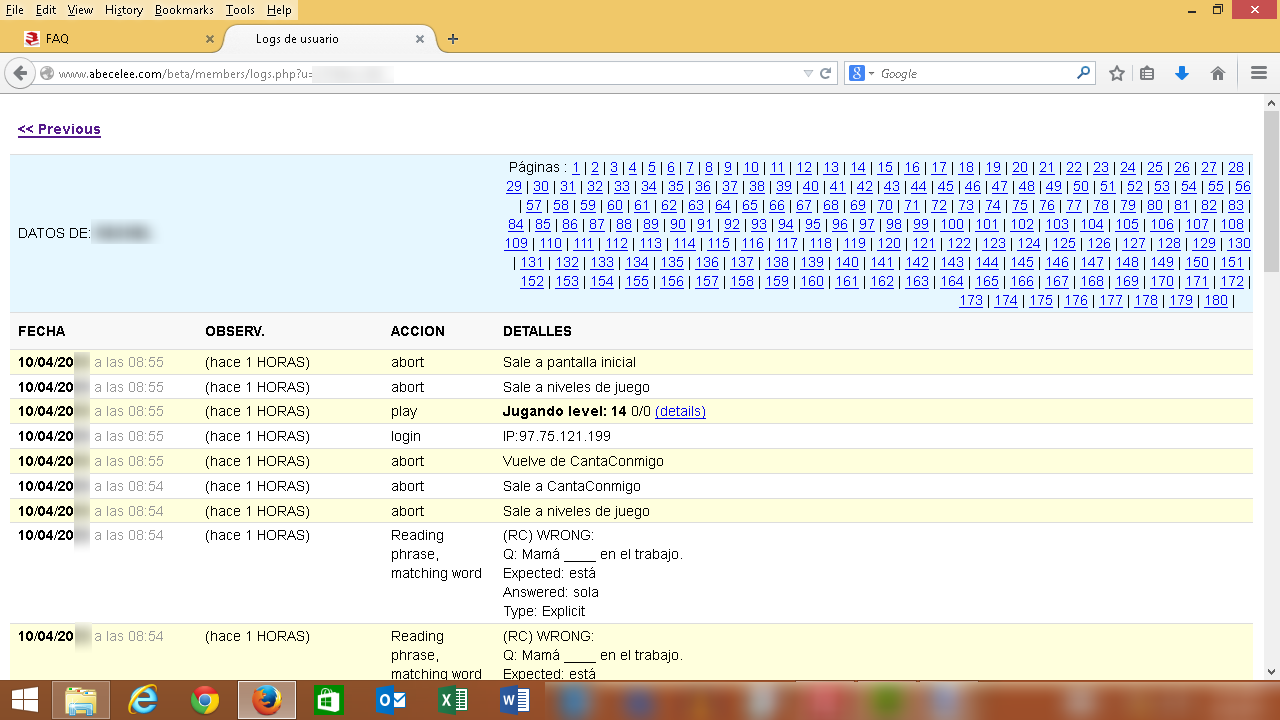
Log (book icon): The students' log. Every interaction with the computer is stored. It is displayed as a series of pages. Teachers can take a close look in real time of what the students are doing, including progress, mistakes, idle time, and pages they visit.
-
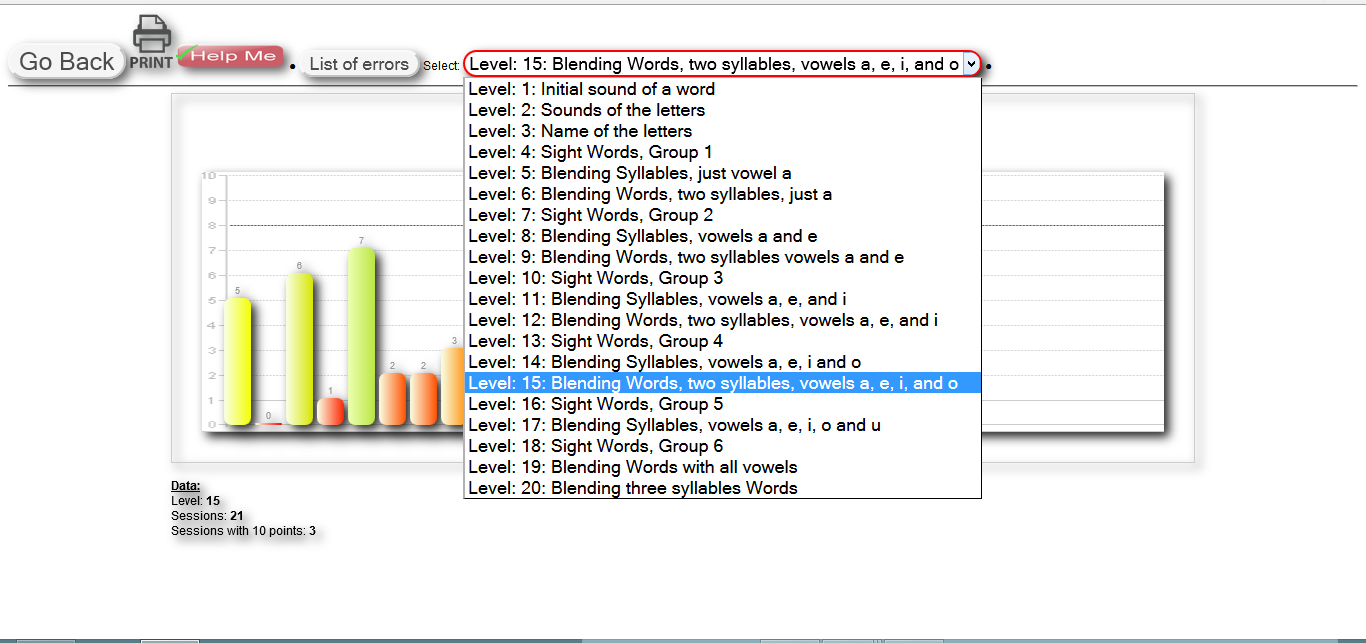
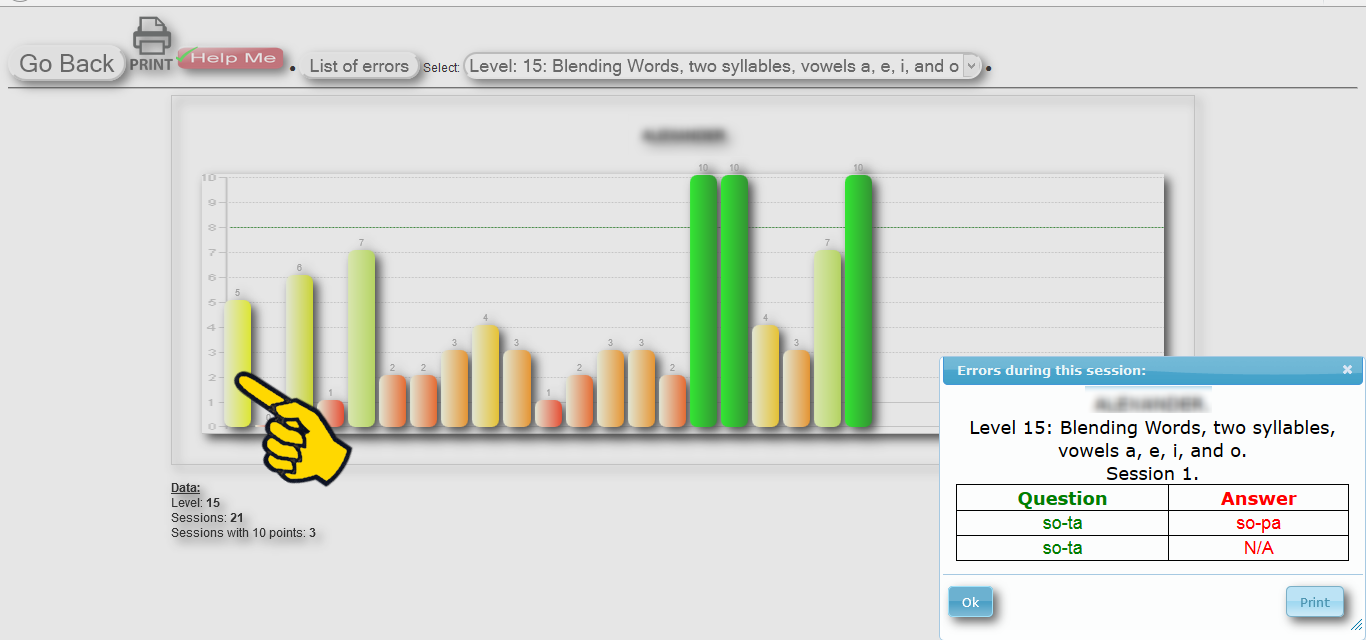
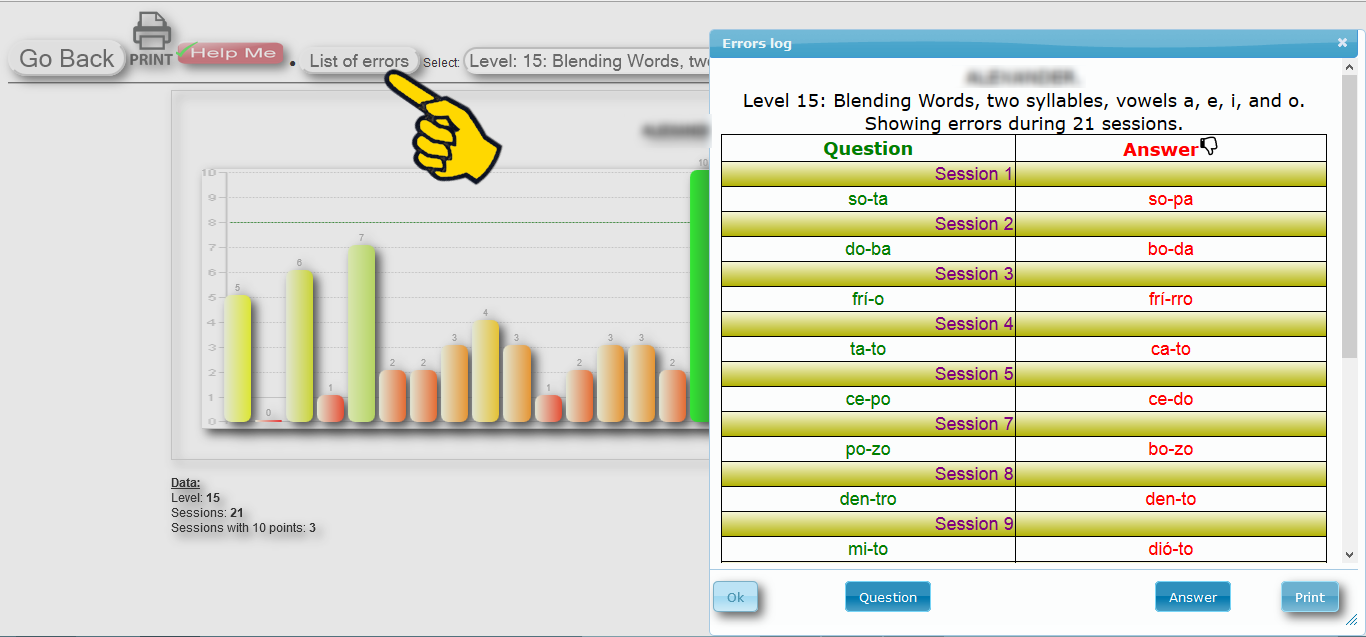
Progress Charts by level: Teachers can browse through all the levels where students have worked or are working on. Every column (or session) in the chart represents how many questions where answered correctly from a set of ten questions. It is used to assess and measure completion, success, failure and frustration. The higher the bar, the better the performance. Three green 10 points bars indicate completion of the level.
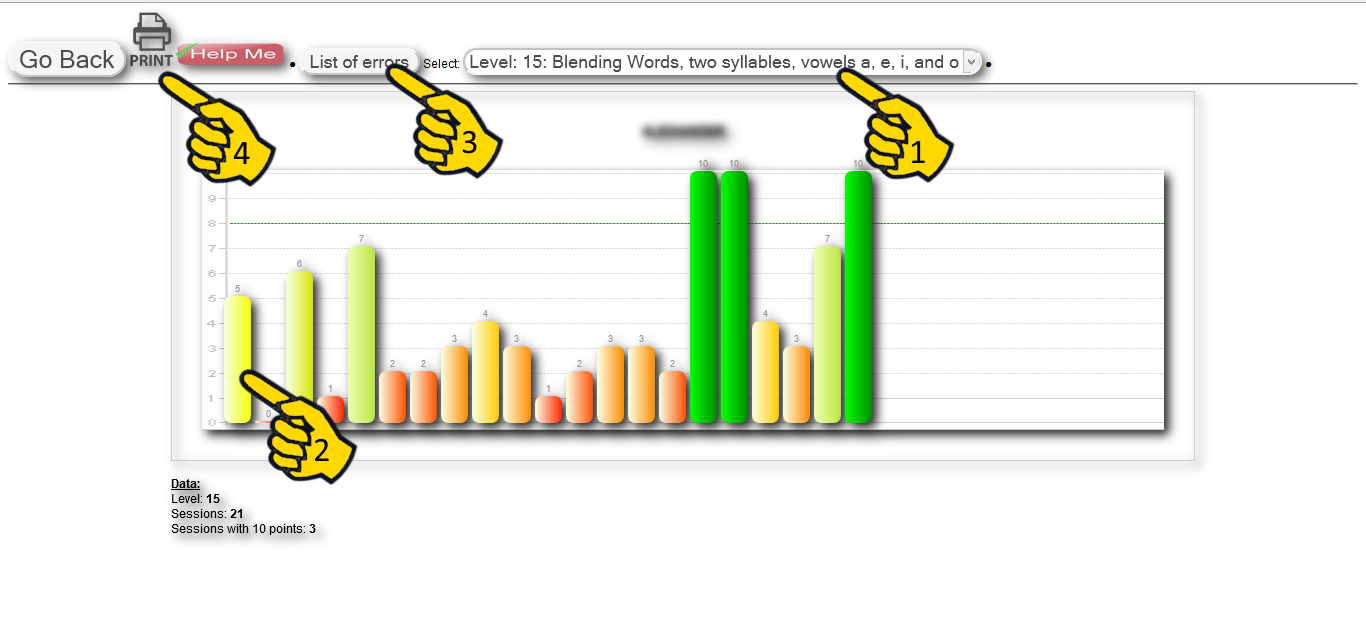
(1) pick a level;
(2) click on a bar to get errors in that session;
(3) click to get all errors in that level;
(4) print that page.
-
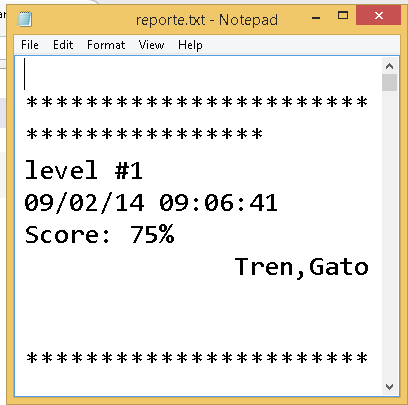
Text File Print: Print your own progress reports from the beginning. Include them in the student's portfolio. Check for understanding, replan your teaching.
-
Comprehension Pie Chart: Once the students are reading in Spanish (which usually occurs somewhere after they complete level #7), the system stores their understanding and reading comprehension. This data is divided in explicit questions (fact that are stated outright), and implicit questions (the reader understands them through other clues in the text), and then displayed in pies charts.
If you click the button "Take action"...
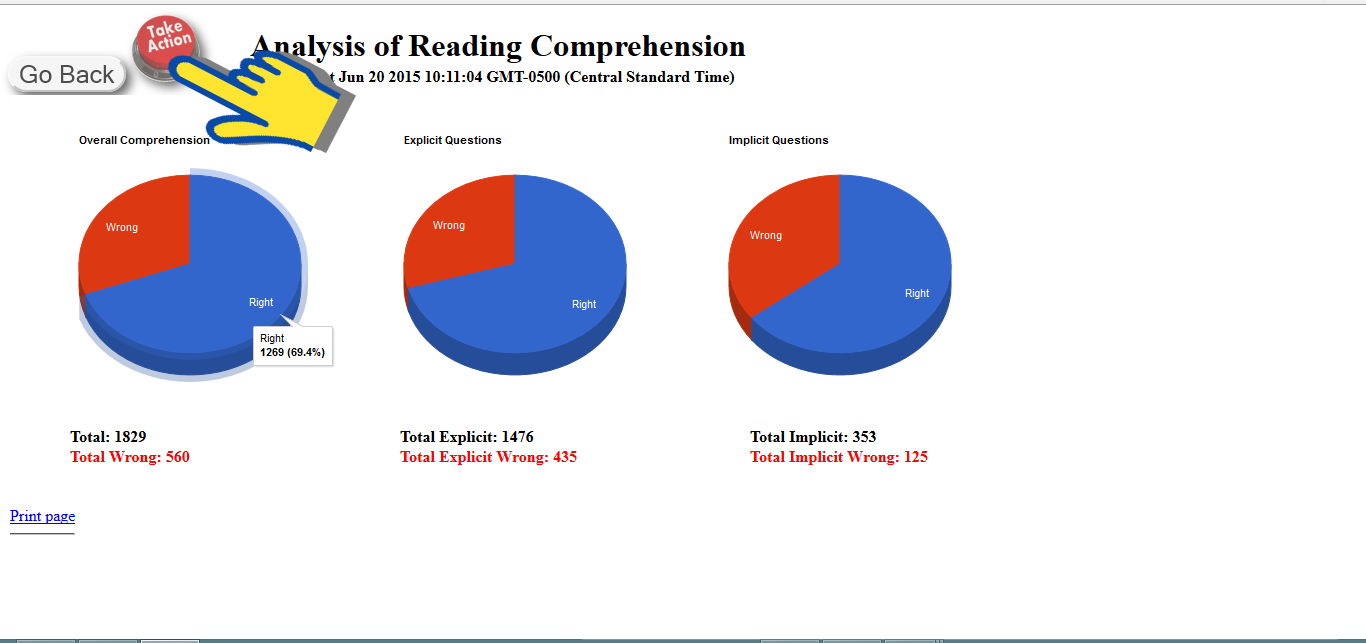
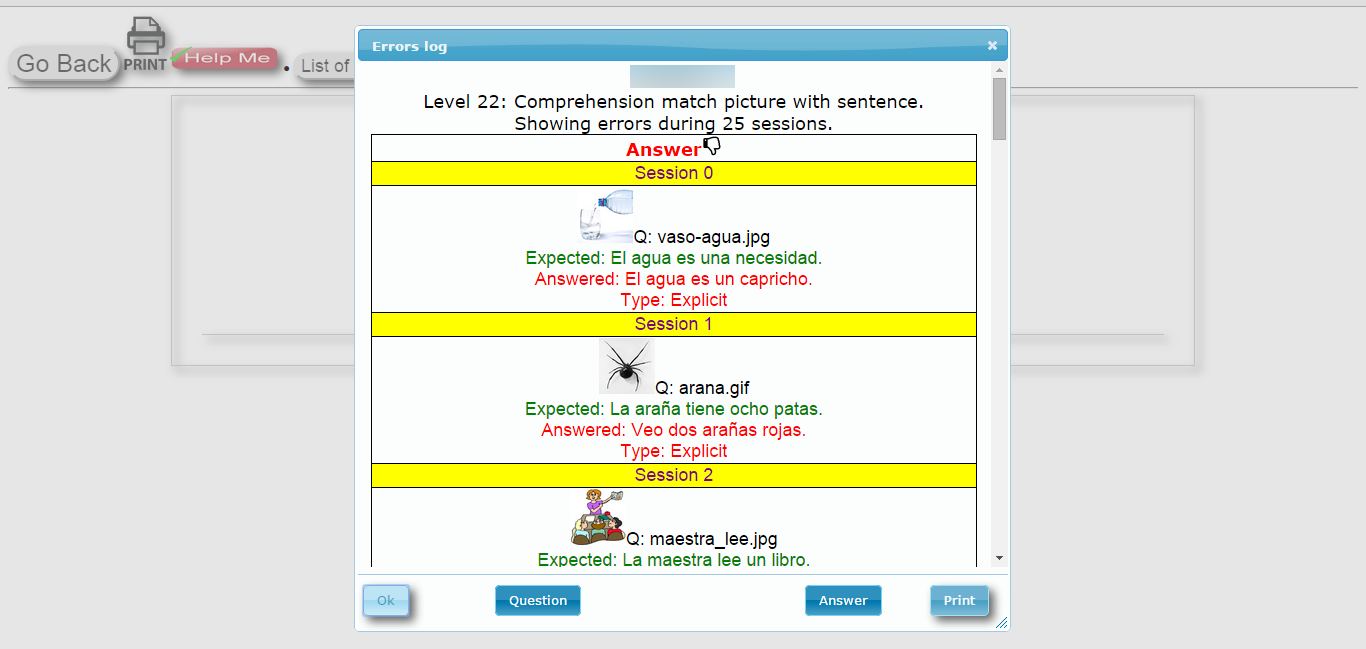
...you are redirected to the...
-
Reading Errors Log: an excellent tool providing errors listed by levels; this lists can be utilized as a reference at the time of replaning and reteaching reading comprehension skills.
 Printing issues?
Printing issues?
Most browsers are tricky when it comes to printing.
TIP: Please follow these steps and you will be okay!
It is not necessary
to be logged
into the Report and Management Web site to
complete this process.
-
First, make sure you know which browser your are using. We are giving directions for Mozilla Firefox, Google Chrome, and IE.
-
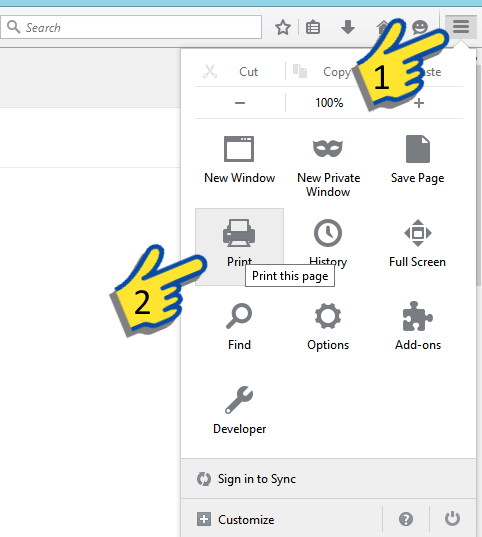
Instructions for Mozilla Firefox:
(1) and (2): Click on the 3 bars icon and then on the print icon.
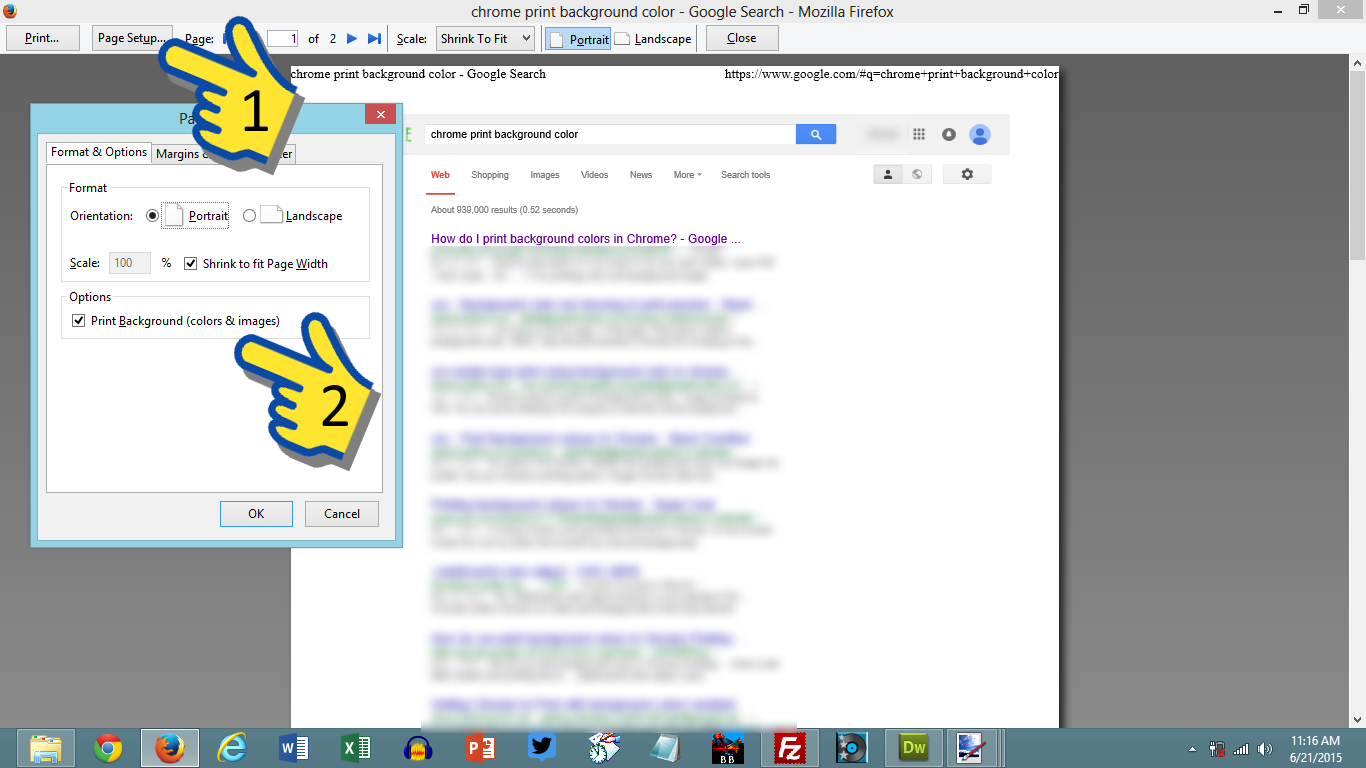
(3) and (4): Click on page setup and then make sure you check "Print Background colors".
-
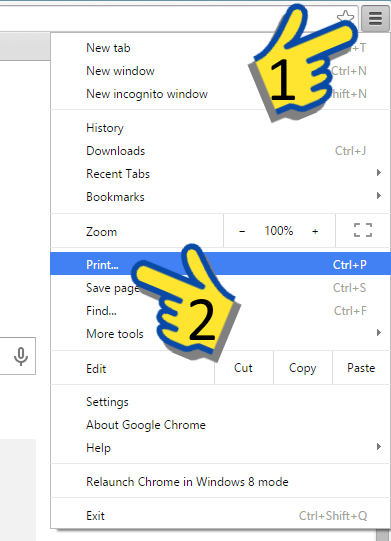
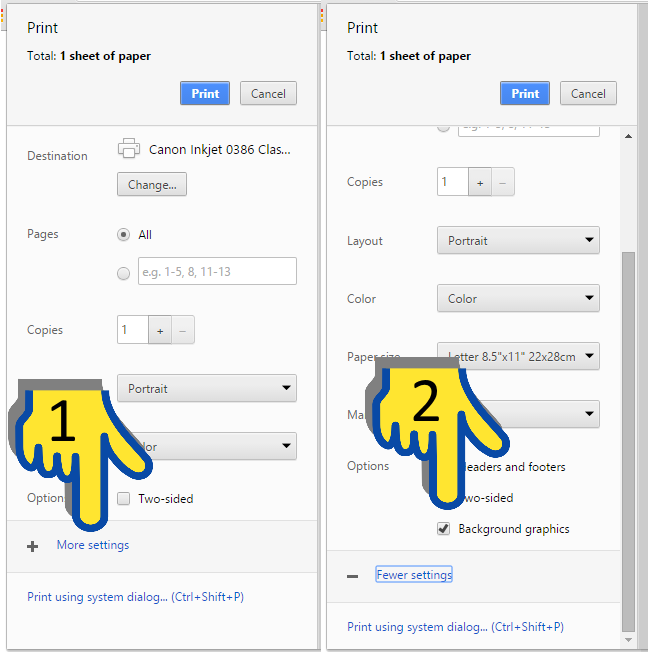
Instructions for Google Chrome:
(1) and (2): Click on the 3 bars icon and then on the print option.
(3) and (4): Click on "More Settings" and then make sure you check "Background Graphics".
-
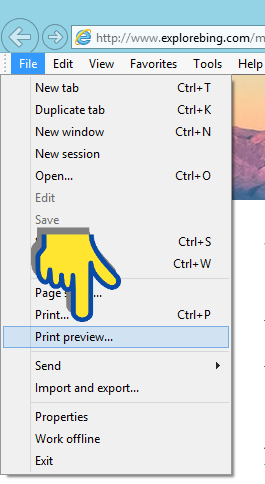
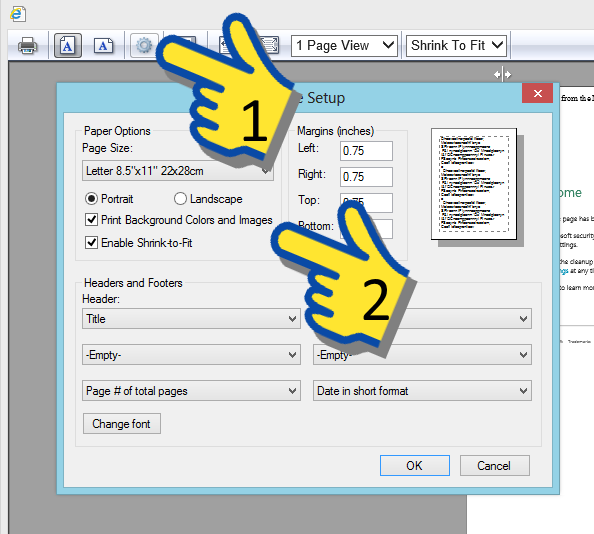
Instructions for Internet Explorer:
(1) and (2): Click on "File" and then on "Print Preview...".
(3) and (4): Click on the little gear and then make sure you check "Print Background Colora".
Standards:
 Are the program modules tied to standards?
 Which Common Core State Standards are impacted by abecelee.com?
abecelee.com and the Common Core State Standards

This is a detailed table showing the correlation between our activities/levels and the Common Core State Standards Reading Standards: Foundational Skills (K–5) RF:
 Which TEKS are impacted by abecelee.com?
abecelee.com and TEKS

This is a detailed table showing the correlation between our activities/levels and TEKS:
Level
|
Focus
|
1, 2, 3 |
K.1.(A)-(G), K.2(A)-(H), K.3(A)-(I) Recogniting print, sound and name of the letter (phonemic awareness) |
1, 4, 6, 7, 9, 12, 13, 15, 16, 18, 20, 21, 22 |
K.5(A)-(E) Acquiring common words that are learned as a whole at a glance (palabras de alta frecuencia) (vocabulary) |
5, 8, 11, 14, 17, 19 |
K.2(A)-(H), K.5(A)-(E) Learning about the construction of syllables. (phonics)
|
6, 9, 12, 15 |
K.2(A)-(H), K.5(A)-(E), K.18(A)-(C) Exercising the construction of two-syllable words. (phonics, vocabulary)
|
20 |
K.2(A)-(H), K3.(A)-(I), K.5(A)-(E) Exercising the construction of words of three syllables. (phonics, vocabulary)
|
21 |
K3.(A)-(I), K.5(A)-(E) Exercising the construction of words of four syllables. (phonics, vocabulary)
|
22 |
Fig 19, K.4(A)-(B), K6(A)-(D), K.7, K.8(A)-(B), K.9, K.10(A)-(D), K.12(A)-(B) Demonstrating reading and reading comprehension abilities (vocabulary, fluency, comprehension) bymatching a picture with the correct sentence that describes it. |
23 |
Fig 19, K.4(A)-(B), K6(A)-(D), K.7, K.8(A)-(B), K.9, K.10(A)-(D), K.12(A)-(B) Demonstrating reading and reading comprehension abilities (vocabulary, fluency, comprehension) by completing a sentence with the correct word that makes sense. |
24-33 |
Fig 19, K.4(A)-(B), K6(A)-(D), K.7, K.8(A)-(B), K.9, K.10(A)-(D), K.12(A)-(B) Demonstrating reading and reading comprehension abilities by reading stories building in complexity, and answering to explicit ands implicit questions from the story read. (vocabulary, fluency, comprehension) |
Technical Requirements:
 Technical Requirements?
Here are the minimum hardware and software requirements for using abecelee.com.
Hardware
PC
- Intel Pentium II 450MHZ or faster
- 128MB of RAM
- Working headphones
Mac
- PowerPC G3, G4, or G5 500MHz or faster
- Intel Core Duo 1.33 Ghz or faster
- 256MB of RAM
- Working headphones
We are mobile device (iPads, iPhones, androids) 100% friendly.
Software
Flash Player 11.x+ is required for all browsers. Verify your Flash version here: http://helpx.adobe.com/flash-player.html
Supported operating systems and browsers are given below.
Recommended: cache memory enabled.
Windows
- MS Windows XP, Vista, 7, or 8
- Internet Explorer 9+
- Firefox 24+
- Chrome 30+
Mac
- OS X 10.4+
- Firefox 24+
- Chrome 30+
- Safari 4.1+


/Forgotten_Your_User_Name.jpg)
/Forgotten_User_Name_or_Password.jpg)


